|
What is the best way to track lots of ads?
If you have so many ads that creating a UTM-powered URL for each ad is not practical, you may be able to use a “Tracking Template” at the campaign or ad set level which will be automatically applied to all your ads.
Setting up a Tracking Template requires the use of ad network placeholder “tokens.” Not all ad networks provide the necessary tokens to do this in the ideal manner, and some ad networks don’t offer support for adding tracking templates at all, which means you’ll have to create a UTM-powered URL for each ad.
Select your ad network below to see what your options are ...
Option 1 – Use the Google Ads Editor application to update your URLs in bulk
If you have a decent number of ads and you’re just looking for a quicker way to update your ads with your new UTM-powered URLs, you’ll probably want to download and use Google Ads Editor.
This official desktop application from Google will allow you to update all of your URLs in one go, rather than having to navigate to each ad individually and update the URL via the web interface.
Option 2 – Create a Tracking Template to use at the Campaign level
If you have so many ads that updating the URLs for each ad is simply not practical, you’ll want to use a Tracking Template that is applied at the Campaign level in Google Ads.
Simply use our handy Tracking Templates Tool, select Google Ads from the list of examples, and then click to copy the generated Tracking Template to your clipboard.
To add this Tracking Template to your Google Ads Campaign, follow the steps below:
1. In your Google Ads account, click the Campaigns icon
2. Expand the Campaigns menu, and select Campaigns
3. Click on the Settings tab to the right
4. Click “Additional settings” at the bottom to reveal all the settings
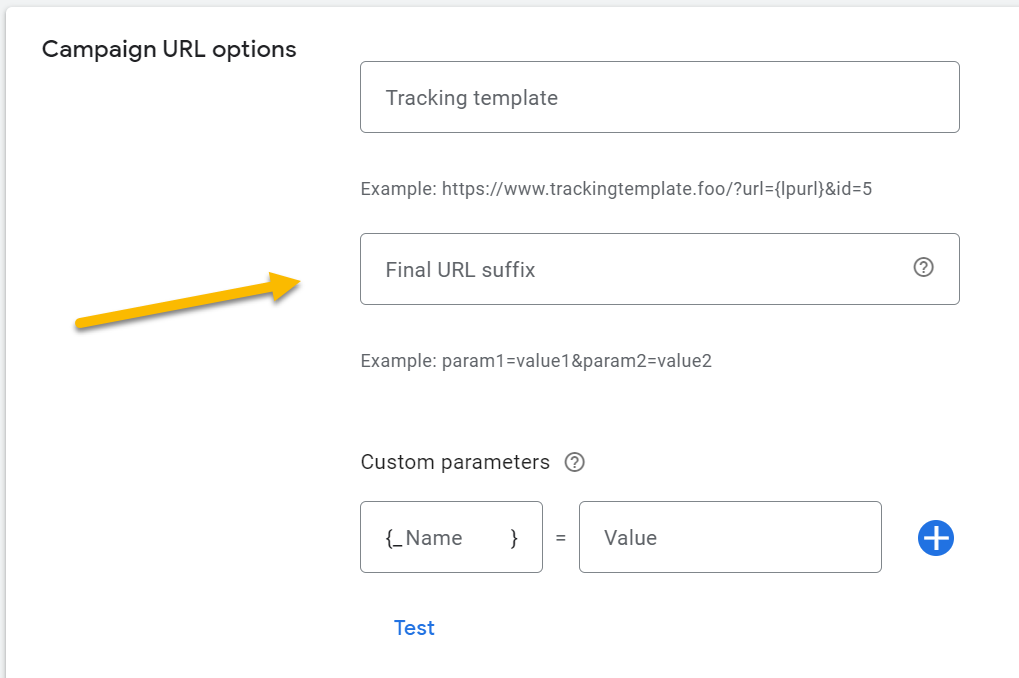
5. Click the “Campaign URL options” setting
6. Finally, paste your Tracking Template into the “Final URL suffix” field as shown below:

Caution: Most of the marketing community thinks of a Tracking Template as just the tracking parameters added to your URL – but in Google Ads a Tracking Template refers to your full URL along with any added parameters.
Google refers to your Tracking Template parameters as the Final URL suffix.
So please make sure you add your ClickMagick Tracking Template in the Final URL suffix field and NOT the Tracking Template field.
Google refers to your Tracking Template parameters as the Final URL suffix.
So please make sure you add your ClickMagick Tracking Template in the Final URL suffix field and NOT the Tracking Template field.
Once you’ve done this, all of the ads in your Google Ads Campaign will be tagged for tracking.
Unfortunately, Google Ads doesn’t provide dynamic tokens for Campaign and Ad names the way Facebook does. So in ClickMagick,
utm_campaign will be set to your Campaign ID and utm_content will be set to the Ad ID.On the plus side, ClickMagick makes it super easy to identify your winning and losing ads by ID. And when viewing your ads in Google you can sort by Ad ID making each individual ad easy to find if you need to make changes.
This is just a minor inconvenience you’ll have to get used to if you truly have so many ads that you can’t set up a UTM-powered URL for each ad.
Facebook provides all the dynamic placeholder tokens you need to build a great Tracking Template.
Simply use our handy Tracking Templates Tool, select Facebook Ads from the list of examples, and then click to copy the generated Tracking Template to your clipboard.
Facebook doesn’t allow you to add a Tracking Template at the Campaign or Ad Set level, but they do make it easy to apply your Tracking Template to all of your ads. Just follow these steps …
1. Login to your Facebook Ads Manager
2. Navigate to the Ads tab
3. Select all ads
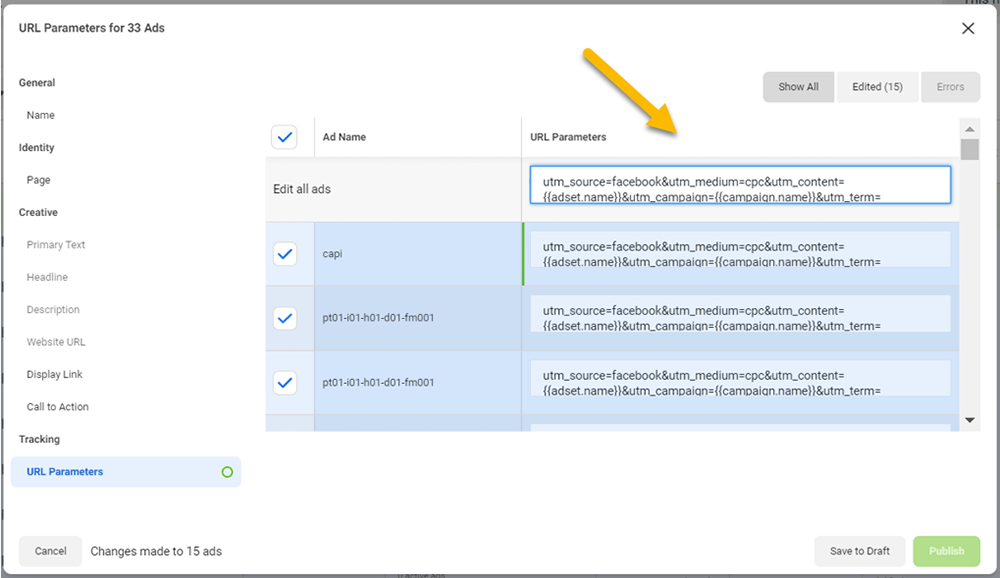
4. Click Edit and select the URL parameters option
5. Select all ads
6. Paste in your Tracking Template
7. Publish the changes

Option 1 – Use the Microsoft Ads Editor application to update your URLs in bulk
If you have a decent number of ads and you’re just looking for a quicker way to update your ads with your new UTM-powered URLs, you’ll probably want to download and use Microsoft Ads Editor.
This official desktop application from Microsoft will allow you to update all of your URLs in one go, rather than having to navigate to each ad individually and update the URL via the web interface.
Option 2 – Create a Tracking Template to use at the Campaign level
If you have so many ads that updating the URLs for each ad is simply not practical, you’ll want to use a Tracking Template that is applied at the Campaign level in Microsoft Ads.
Simply use our handy Tracking Templates Tool, select Microsoft Ads from the list of examples, and then click to copy the generated Tracking Template to your clipboard.
To add this Tracking Template to your Microsoft Ads Campaign, follow the steps below:
1. Login to your Microsoft Ads account
2. Click Settings in the left-hand menu
3. Select the Campaign you want to add a Tracking Template to
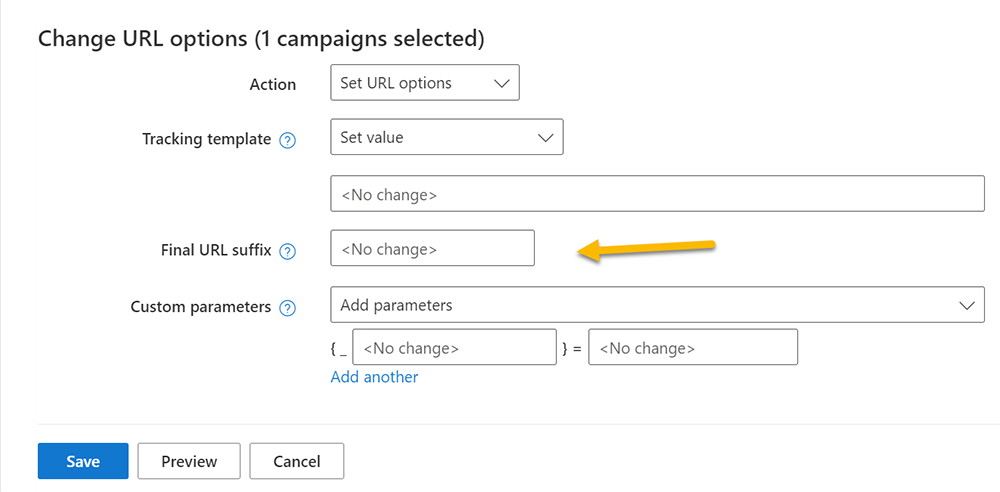
4. Click the Edit menu and select Change URL Options
5. Finally, paste your Tracking Template into the Final URL suffix field as shown below:

Caution: Most of the marketing community thinks of a Tracking Template as just the tracking parameters added to your URL – but in Microsoft Ads a Tracking Template refers to your full URL along with any added parameters.
Microsoft refers to your Tracking Template parameters as the Final URL suffix.
So please make sure you add your ClickMagick Tracking Template in the Final URL suffix field and NOT the Tracking Template field.
Microsoft refers to your Tracking Template parameters as the Final URL suffix.
So please make sure you add your ClickMagick Tracking Template in the Final URL suffix field and NOT the Tracking Template field.
Once you’ve done this, all of the ads in your Microsoft Ads Campaign will be tagged for tracking.
Unfortunately, Microsoft Ads doesn’t provide a dynamic token for Ad names the way Facebook does. So in ClickMagick,
utm_content will be set to the Ad ID.On the plus side, ClickMagick makes it super easy to identify your winning and losing ads by ID. And when viewing your ads in Microsoft Ads you can sort by Ad ID making each individual ad easy to find if you need to make changes.
This is just a minor inconvenience you’ll have to get used to if you truly have so many ads that you can’t set up a UTM-powered URL for each ad.
While TikTok doesn’t offer the ability to add a Tracking Template, they do provide all the dynamic tokens necessary to use the same URL for all ads within a campaign. Here’s how to generate that URL …
1. Navigate to ClickMagick’s URL Builder
2. Enter your Landing Page URL
3. For
utm_source enter tiktok (or anything else you want)4. For
utm_medium enter cpc (or anything else you want)5. For
utm_campaign click “Add token” and select the TikTok __CAMPAIGN_NAME__ token6. For
utm_term click “Add token” and select the TikTok __AID_NAME__ token7. For
utm_content click “Add token” and select the TikTok __CID_NAME__ token8. For Auto Cost Update, select TikTok Ads
9. Then click “Save & Copy URL”
You can now use this single URL for all of your ads within a single TikTok Ads campaign.
When users click your ads the dynamic tokens for the campaign name, ad group name, and ad or creative name will be replaced with the actual values, which is what you’ll see in ClickMagick.
While Pinterest doesn’t offer the ability to add a Tracking Template, they do provide all the dynamic tokens necessary to use the same URL for all ads within a campaign. Here’s how to generate that URL …
1. Navigate to ClickMagick’s URL Builder
2. Enter your Landing Page URL
3. For
utm_source enter pinterest (or anything else you want)4. For
utm_medium enter cpc (or anything else you want)5. For
utm_campaign click “Add token” and select the Pinterest {campaign_name} token6. For
utm_term click “Add token” and select the Pinterest {keyword} token7. For
utm_content click “Add token” and select the Pinterest {adid} token8. Then click “Save & Copy URL”
You can now use this single URL for all of your ads within a single Pinterest Ads campaign.
When users click your ads the dynamic tokens for the Campaign name, Keyword, and Ad ID will be replaced with the actual values, which is what you’ll see in ClickMagick.
While Pinterest unfortunately doesn’t provide an ad name token, ClickMagick makes it super easy to identify your winning and losing ads by ID. And when viewing your ads in Pinterest you can sort by Ad ID making each individual ad easy to find if you need to make changes.
This is just a minor inconvenience you’ll have to get used to if you truly have so many ads that you can’t set up a UTM-powered URL for each ad.
While Snapchat doesn’t offer the ability to add a Tracking Template, they do provide all the dynamic tokens necessary to use the same URL for all ads within a campaign. Here’s how to generate that URL …
1. Navigate to ClickMagick’s URL Builder
2. Enter your Landing Page URL
3. For
utm_source enter snapchat (or anything else you want)4. For
utm_medium enter cpc (or anything else you want)5. For
utm_campaign click “Add token” and select the Snapchat {{campaign.name}} token6. For
utm_term click “Add token” and select the Snapchat {{adSet.name}} token7. For
utm_content click “Add token” and select the Snapchat {{creative.name}} token8. Then click “Save & Copy URL”
You can now use this single URL for all of your ads within a single Snapchat Ads campaign.
When users click your ads the dynamic tokens for the campaign name, ad set name, and ad or creative name will be replaced with the actual values, which is what you’ll see in ClickMagick.
Unfortunately Twitter does not provide any dynamic tokens at all, so there really are no options here. You’ll have to create and use a separate UTM-powered URL for each ad.
If you’re managing your Instagram ads using Facebook Ads Manager just follow the steps for Facebook.
Article 878 Last updated: 06/06/2023 6:55:32 AM
https://www.clickmagick.com/kb/?article=878