How do I add a custom form from my autoresponder to OptimizePress?
Cross-device tracking is an excellent way to keep track of potential customers that sign up to your list on one device, but then make the purchase another time on another browser or device.
If you rely on email follow-ups to drive your sales cycle, cross-device tracking is critical to getting the most accurate stats possible to scale your traffic and optimize your business.
This article will show you how to add a custom form to OptimizePress so you can use cross-device tracking.
If you have not created your cmc_vid field or the custom form in the autoresponder you are using, please review the article below related to cross-device tracking. and make sure your custom field and custom form are created before trying to add anything to OptimizePress.
4. Select the list that you have within Aweber to use for this integration.
5. Select the custom field (cmc_vid) you previously created in Aweber.
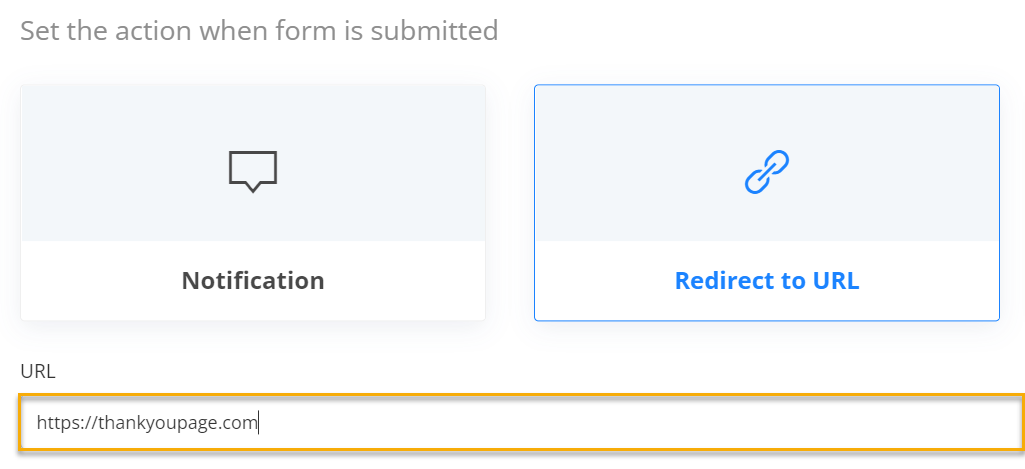
6. Click through the next few pages until you get to the page to set the action when the form is submitted. Select “Redirect to URL” and add your thank you page URL into the box.
7. Finish the setup process for this integration and go back to the page editor.
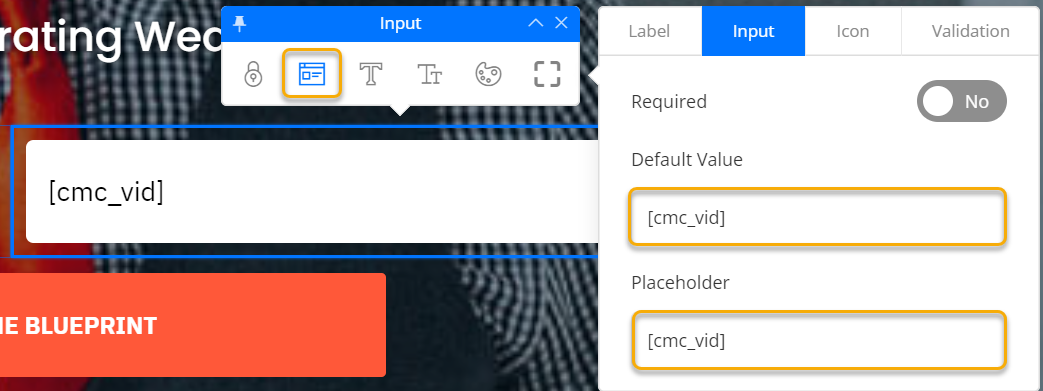
8. Click on the cmc_vid field you see on the page now, click on the form icon, then in the Input tab you will need to add [cmc_vid] to both the “Default Value” and “Placeholder” boxes.
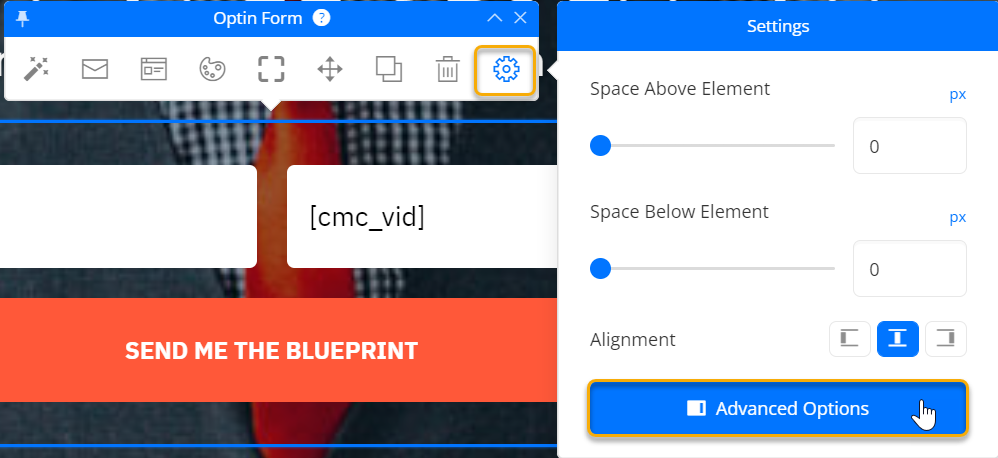
9. Click back on the page to edit the opt-in form and click on the settings icon, then click on “Advanced Options”
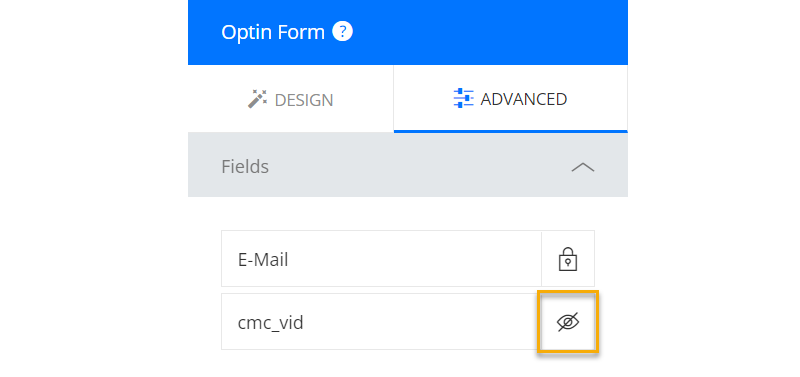
10. On the left side you will see the two fields displayed. Click on the icon that looks like an eyeball to hide the field from view. This will prevent your customers from seeing the tracking field you’re using when they visit the page.
11. Click “Save” at the top right of that page, and that’s it! You’ve integrated Aweber with OptimizePress and are now using the custom field you created for tracking!
How To Add a GetResponse Custom Form
1. In OptimizePress, edit the landing page where you want to add the form.
2. Click on the form area, click the integration icon (envelope button), then click “Edit Integration”
3. Choose the GetResponse Integration
If you do not have any autoresponder integrations listed, check out the following article to learn how to add integrations to OptimizePress:
4. Select the list that you have within GetResponse to use for this integration.
5. Select the custom field (cmc_vid) you previously created in GetResponse.
6. Click through the next few pages until you get to the page to set the action when the form is submitted. Select “Redirect to URL” and add your thank you page URL into the box.
7. Finish the setup process for this integration and go back to the page editor.
8. Click on the cmc_vid field you see on the page now, click on the form icon, then in the Input tab you will need to add [cmc_vid] to both the “Default Value” and “Placeholder” boxes.
9. Click back on the page to edit the opt-in form and click on the settings icon, then click on “Advanced Options”
10. On the left side you will see the two fields displayed. Click on the icon that looks like an eyeball to hide the field from view. This will prevent your customers from seeing the tracking field you’re using when they visit the page.
11. Click “Save” at the top right of that page, and that’s it! You’ve integrated GetResponse with OptimizePress and are now using the custom field you created for tracking!
How To Add a Mailchimp Custom Form
1. In OptimizePress, edit the landing page where you want to add the form.
2. Click on the form area, click the integration icon (envelope button), then click “Edit Integration”
3. Choose the Mailchimp Integration
If you do not have any autoresponder integrations listed, check out the following article to learn how to add integrations to OptimizePress:
4. Select the list that you have within Mailchimp to use for this integration.
5. Select the custom field (cmc_vid) you previously created in Mailchimp.
6. Click through the next few pages until you get to the page to set the action when the form is submitted. Select “Redirect to URL” and add your thank you page URL into the box.
7. Finish the setup process for this integration and go back to the page editor.
8. Click on the cmc_vid field you see on the page now, click on the form icon, then in the Input tab you will need to add [cmc_vid] to both the “Default Value” and “Placeholder” boxes.
9. Click back on the page to edit the opt-in form and click on the settings icon, then click on “Advanced Options”
10. On the left side you will see the two fields displayed. Click on the icon that looks like an eyeball to hide the field from view. This will prevent your customers from seeing the tracking field you’re using when they visit the page.
11. Click “Save” at the top right of that page, and that’s it! You’ve integrated Mailchimp with OptimizePress and are now using the custom field you created for tracking!
How To Add an ActiveCampaign Custom Form
1. In OptimizePress, edit the landing page where you want to add the form.
2. Click on the form area, click the integration icon (envelope button), then click “Edit Integration”
3. Choose the ActiveCampaign Integration
If you do not have any autoresponder integrations listed, check out the following article to learn how to add integrations to OptimizePress:
4. Select the list that you have within ActiveCampaign to use for this integration.
5. Select the custom field (cmc_vid) you previously created in ActiveCampaign.
6. Click through the next few pages until you get to the page to set the action when the form is submitted. Select “Redirect to URL” and add your thank you page URL into the box.
7. Finish the setup process for this integration and go back to the page editor.
8. Click on the cmc_vid field you see on the page now, click on the form icon, then in the Input tab you will need to add [cmc_vid] to both the “Default Value” and “Placeholder” boxes.
9. Click back on the page to edit the opt-in form and click on the settings icon, then click on “Advanced Options”
10. On the left side you will see the two fields displayed. Click on the icon that looks like an eyeball to hide the field from view. This will prevent your customers from seeing the tracking field you’re using when they visit the page.
11. Click “Save” at the top right of that page, and that’s it! You’ve integrated ActiveCampaign with OptimizePress and are now using the custom field you created for tracking!
How To Add a ConvertKit Custom Form
1. In OptimizePress, edit the landing page where you want to add the form.
2. Click on the form area, click the integration icon (envelope button), then click “Edit Integration”
3. Choose the ConvertKit Integration
If you do not have any autoresponder integrations listed, check out the following article to learn how to add integrations to OptimizePress:
4. Select the list that you have within ConvertKit to use for this integration.
5. Select the custom field (cmc_vid) you previously created in ConvertKit.
6. Click through the next few pages until you get to the page to set the action when the form is submitted. Select “Redirect to URL” and add your thank you page URL into the box.
7. Finish the setup process for this integration and go back to the page editor.
8. Click on the cmc_vid field you see on the page now, click on the form icon, then in the Input tab you will need to add [cmc_vid] to both the “Default Value” and “Placeholder” boxes.
9. Click back on the page to edit the opt-in form and click on the settings icon, then click on “Advanced Options”
10. On the left side you will see the two fields displayed. Click on the icon that looks like an eyeball to hide the field from view. This will prevent your customers from seeing the tracking field you’re using when they visit the page.
11. Click “Save” at the top right of that page, and that’s it! You’ve integrated ConvertKit with OptimizePress and are now using the custom field you created for tracking!
How To Add An Ontraport Custom Form
Due to how the Ontraport integration works with Optimize press making things extremely confusing, we will be using the custom HTML you created during the form creation process in this article.
1. In OptimizePress, edit the landing page where you want to add the form.
2. Click on the form area, click the integration icon (envelope button), then click “Edit Integration”
3. Choose the “Custom HTML” option.
4. Add the custom code you modified during the step for creating the custom form in the article mentioned above.
5. You will notice that the cmc_vid field is already selected and has a lock symbol next to it (meaning it’s required), and the hidden symbol. This is normal.
6. Click through the next few pages until you get to the page to set the action when the form is submitted. Select “Redirect to URL” and add your thank you page URL into the box.
7. Finish the setup process for this integration and go back to the page editor.
8. Click “Save” at the top right of that page, and that’s it! You’ve integrated Ontraport with OptimizePress and are now using the custom field you created for tracking!
Article 830 Last updated: 03/13/2023 12:20:46 PM https://www.clickmagick.com/kb/?article=830