|
How do I set up a custom domain using a subdirectory?
Usually, when you set up a custom tracking domain, you would use one of these subdomain formats:
https://yourdomain.com

https://www.yourdomain.com

https://track.yourdomain.com
In some cases, you might want to use a slightly different style which uses a subdirectory:
https://yourdomain.com/recommends/If you want to use
yourdomain.com or a subdomain such as track.yourdomain.com as your tracking domain, you’ll want to set up your custom domain using the CNAME DNS record, explained here:How do I set up a secure custom tracking domain?
If you want to use the
yourdomain.com/recommends/ subdirectory style, you’ll need to set up your tracking domain using Script Forwarding with your own server, and that setup process is explained below.Caution: Unless you have a really good reason for using the subdirectory style, we recommend using the CNAME DNS method—it’s rock-solid, performs faster redirects, and will still deliver your clicks even if your own server goes down for any reason.
To set up your custom tracking domain using Script Forwarding, follow the step-by-step instructions in this article.
Step 1 – Set Up a Server
Unless you already have your own server, you must sign up for a decent Linux VPS or cloud server plan with a dedicated IP address.
Expect to pay no more than $10-$20 USD a month for this.
You don’t need a dedicated IP address, but it’ll help you get the best email deliverability possible if you’ll be running email campaigns from your server. All VPS and cloud server accounts should come with a dedicated IP address.
We do NOT recommend using a cheap shared hosting plan. Shared hosting plans can lose clicks due to their overburdened servers and can also cause visitors to click away from your offers before they see anything because pages pull up so slowly. Our advice—don’t risk it!
Step 2 – Create Your Customized Settings Files
We have a Setup Wizard to help you generate the custom files: Launch the Setup Wizard. The Setup Wizard will generate a compressed file called
[USERNAME].zip that you can download.Step 3 – Upload the Compressed File to a Subdirectory In Your Hosting Account
First, create a new subdirectory on your domain, such as
yourdomain.com/recommends/, then upload the file [USERNAME].zip to the directory.Once uploaded, use your file manager or FTP program to extract the
[USERNAME].zip file. This should create two additional files:htaccessindex.phpIf your file manager or FTP program can’t extract the file, you can extract the file before uploading, then separately upload the two files shown above.
Step 4 – Rename the File Named
htaccess to .htaccessYou must rename the
htaccess file so that it starts with a period (.).If you can’t add a period to the start of the filename, it’s most likely caused by a setting somewhere in your hosting account file manager. In this case, you’ll need to contact your hosting company, and they’ll tell you how to change the filename.
Step 5 – Add Your New Domain to Your ClickMagick Domain Manager
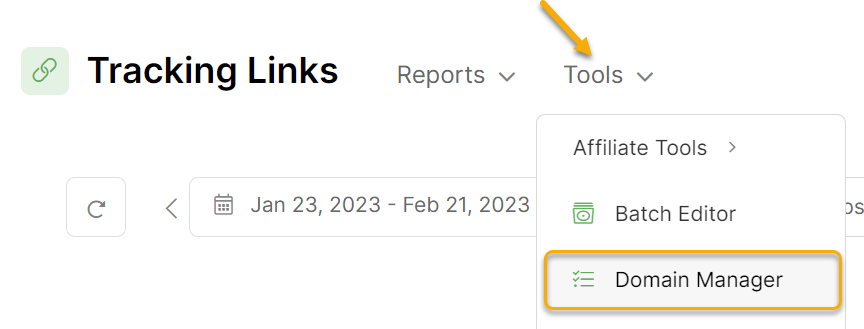
In Tracking Links, click on Tools and select Domain Manager.

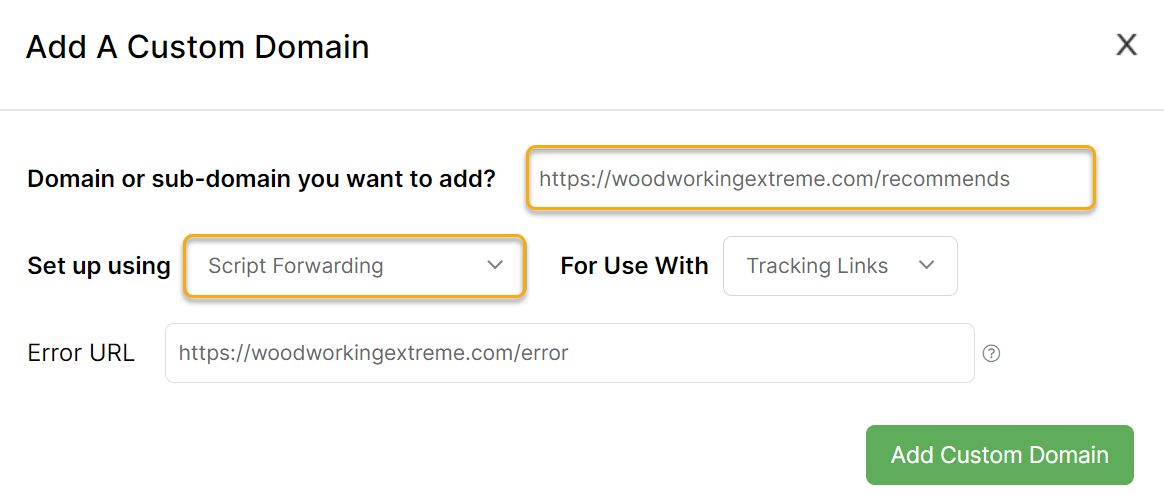
Add a new domain, enter your full URL, including the subdirectory, and choose the option to set up using script forwarding.
For example, if you created the subdirectory
/recommends and you uploaded your files there, the full tracking domain would be:yourdomain.com/recommends
When you attempt to add your tracking domain to the Domain Manager, you may get an error saying that the domain can’t be found. Just read the error message and follow any instructions.
When you create a new domain, it can take 1 to 24 hours for the domain to become active on the Internet. If you get an error when you try to add the domain to the Domain Manager, wait a bit and try again.
You’ll get all the benefits of a custom domain with a dedicated IP, and the script we provide will route all of your traffic through your ClickMagick account.
Troubleshooting
| Problem #1 | The most common problem people encounter when setting up custom domain Script Forwarding is an “Internal Server Error” when testing a tracking link using their new custom tracking domain. This has nothing to do with ClickMagick, but rather it indicates that your server isn’t correctly set up to use .htaccess files in the directory you uploaded the files.Unfortunately, this isn’t something we can help with from our end, so if you’re 100% positive you did step #4 above, you’ll need help from your hosting company … 99 out of 100 times, things will be set up correctly by default, but in case you’re one of the unlucky few who have a non-standard Apache setup, please tell your hosting company the following: “I’m trying to use .htaccess files in XYZ directory [the directory where you uploaded the files], but it’s not working. Can you take a look or let me know how to enable .htaccess files in this directory?” |
| Problem #2 | You’re trying to use your tracking or rotator domain without a link slug and getting an error telling you that the link slug is missing. If you’re getting this error, it simply means that you’re entering your custom domain without specifying a link slug. That doesn’t mean there is anything wrong with your custom domain. For example, whenever you create a new link, you will be asked to choose a unique link slug to distinguish that link from all the others in your account. So, if you were to create a link with the link slug video, you would reference that link using your custom domain like this: https://yourdomain.com/recommends/videoIf you forget to add the /video , you will be told that the “link slug is missing from that URL.” That’s perfectly normal behavior, and there is nothing wrong with your custom domain. |
Tip: If you’re getting an error that is not explained here, every possible custom domain error that ClickMagick generates is explained in this article:
How do I troubleshoot my custom domain setup?
How do I troubleshoot my custom domain setup?
Article 61 Last updated: 10/21/2024 12:29:24 PM
https://www.clickmagick.com/kb/?article=61