|
How do I track sales in ThriveCart?
ThriveCart gives Vendors the ability to add tracking pixels to their order form pages and order summary pages.
To get started with tracking your sales in ClickMagick, follow the steps below.
Step 1 - Add Your Engagement Conversion Code Into ThriveCart
To add your engagement conversion code in ThriveCart, navigate to “Checkout” then select “Tracking” and check “Custom tracking code.”
In the “Checkout page” section, add the Engagement Conversion Code as shown below:
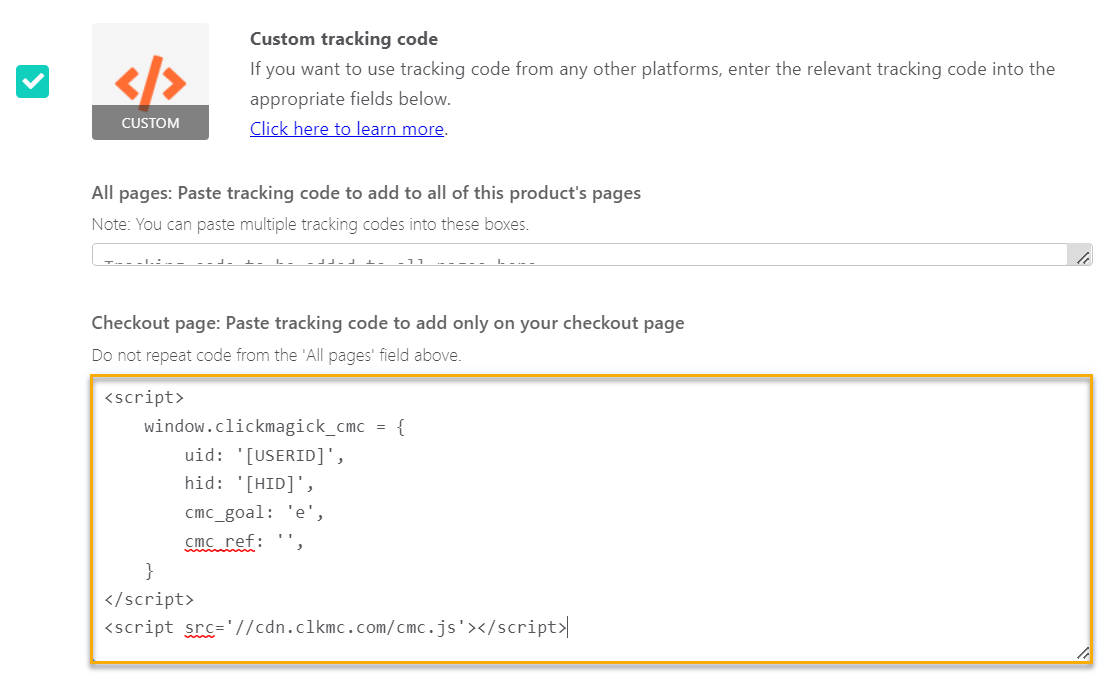
Here is your Engagement Conversion Code for your account:
<script>

    window.clickmagick_cmc = {

        uid: '[USERID]',

        hid: '[HID]',

        cmc_goal: 'e',

        vid_info: 'on',

        cmc_ref: 'checkout',

    }

</script>

<script src='//cdn.clkmc.com/cmc.js'></script>
Tracking your order bumps in ThriveCart
To track your order bumps, use the
log_orderbump in your Engagement conversion code that gets placed on your checkout page.You can find the
log_orderbump in the Advanced Options when getting your Engagement Conversion Code: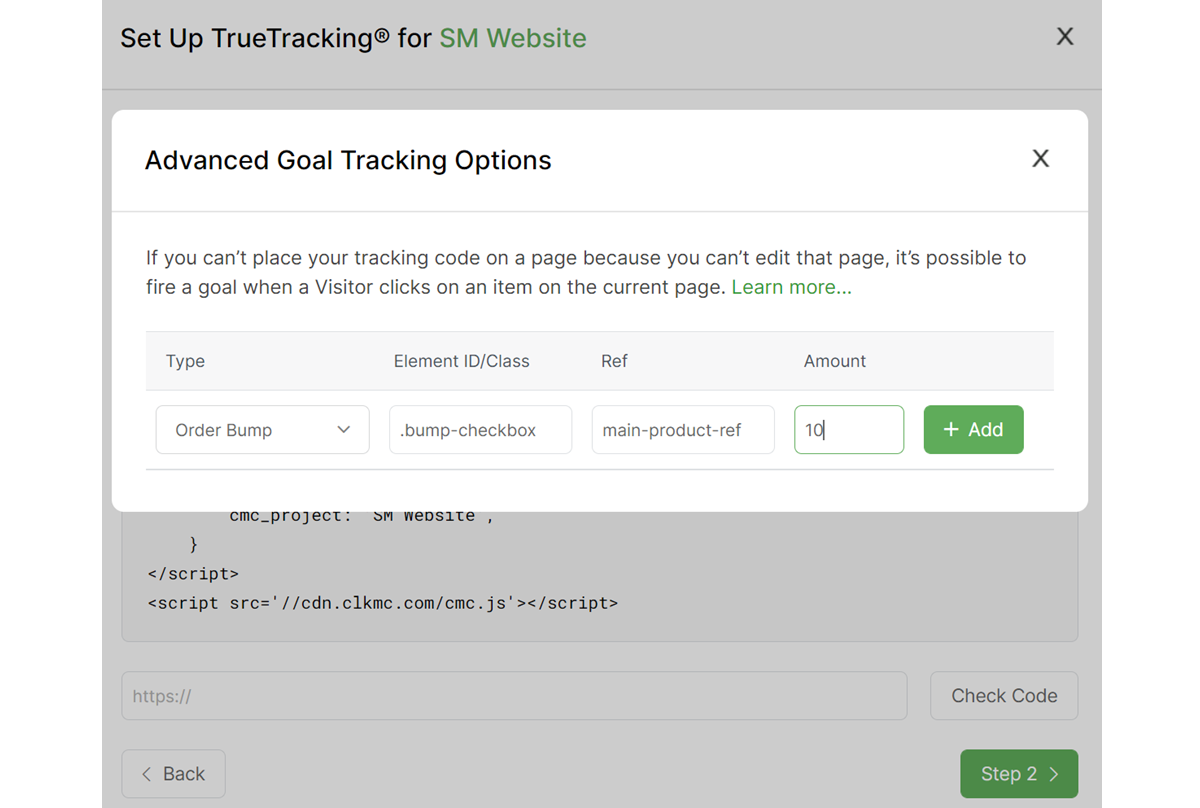
You can also use the code below:
<script>

    window.clickmagick_cmc = {

        uid: '[USERID]',

        hid: '[HID]',

        cmc_goal: 'e',

        cmc_ref: 'checkout',

        vid_info: 'on',

        log_orderbump: '.bump-checkbox:19.99:sale',

    }

</script>

<script src='//cdn.clkmc.com/cmc.js'></script>
Do not change the
.bump-checkbox or sale portion of the code, but make sure to change 19.99 to the actual price of your order bump. Step 2 – Tracking Your Front End Offer
If you don't currently have any upsells or downsells, add the sales conversion code below to the "Main product" section shown below:
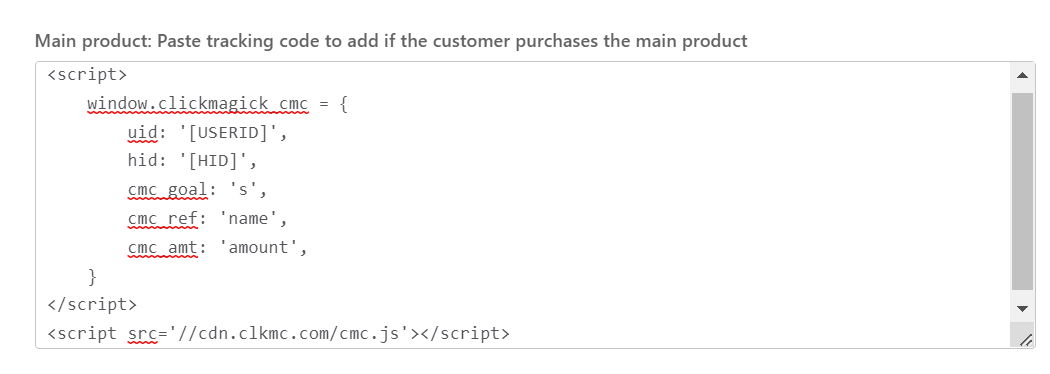
Your Sales Conversion Code:
<script>

    window.clickmagick_cmc = {

        uid: '[USERID]',

        hid: '[HID]',

        cmc_goal: 's',

        cmc_ref: 'sale',

        cmc_amt: '49.95',

    }

</script>

<script src='//cdn.clkmc.com/cmc.js'></script>
Make sure to change
49.95 to the price of your main product.If you have upsells or downsells, add your sales conversion code to the first page people see after placing an order.
For ThriveCart hosted upsell pages, use the following steps:
Launch the Upsell Editor inside of ThriveCart and add the "Custom HTML" block to your page.

Double click in the block and add the Sales Conversion Code given above.
Step 3 – Tracking Your Upsells And Downsells
Due to ThriveCart providing vendors to add JavaScript and pixels to upsells or downsells, tracking specific products purchased in your funnel is easy.
Head to your Upsells page inside of ThriveCart that features a list of all of your upsells.
Edit your upsell and head to the "Tracking" tab and check the "Do you want to add tracking code..." box
Paste in your Upsell Logging code below:
<script>

    window.clickmagick_cmc = {

        uid: '[USERID]',

        hid: '[HID]',

        log_upsell: '.button:price:upsellname',

    }

</script>

<script src='//cdn.clkmc.com/cmc.js'></script>
You'll need to update the
price and upsellname values for the code to work.For example, if you sell a $47 upsell called Gold Coins then your code will look like this:
<script>

    window.clickmagick_cmc = {

        uid: '[USERID]',

        hid: '[HID]',

        log_upsell: '.button:47:goldcoins',

    }

</script>

<script src='//cdn.clkmc.com/cmc.js'></script>
Then, take the Sales Logging code above and add it to all of your upsells and downsells.
Note: Do not change the
.button portion of the code. ThriveCart buttons are in the button CSS class, so to track the clicks on the button the .button must be used.Step 4 – Include
?cmc_vid=[cmc_vid] at the end of your checkout page link.For example, if your ThriveCart checkout page URL is:
https://[USERNAME].thrivecart.com/offerThen you add
?cmc_vid=[cmc_vid], it should look like this:https://[USERNAME].thrivecart.com/offer?cmc_vid=[cmc_vid]Another way to create the link is by using the Campaign URL Builder to create your URL:
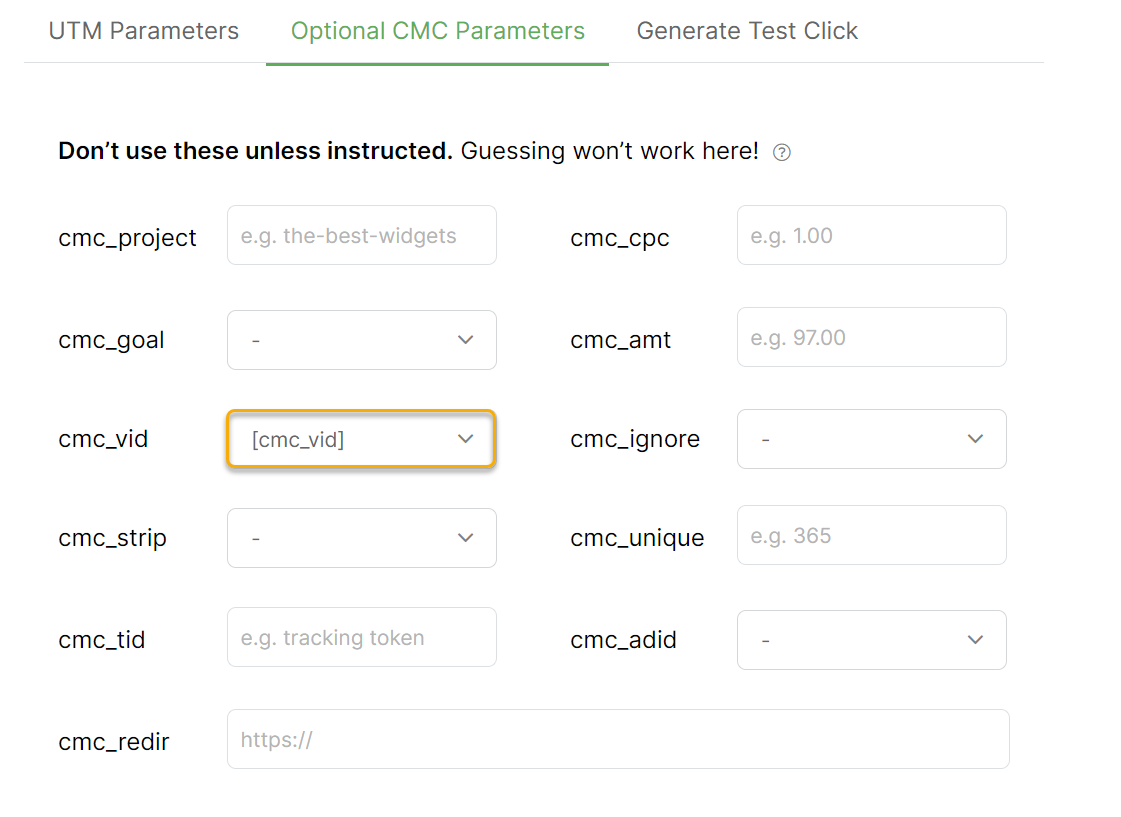
Step 1 – Tracking Your Front End Offer
If you don't have any upsells or downsells, add the Sales Pixel below to the "Main product" section shown below:
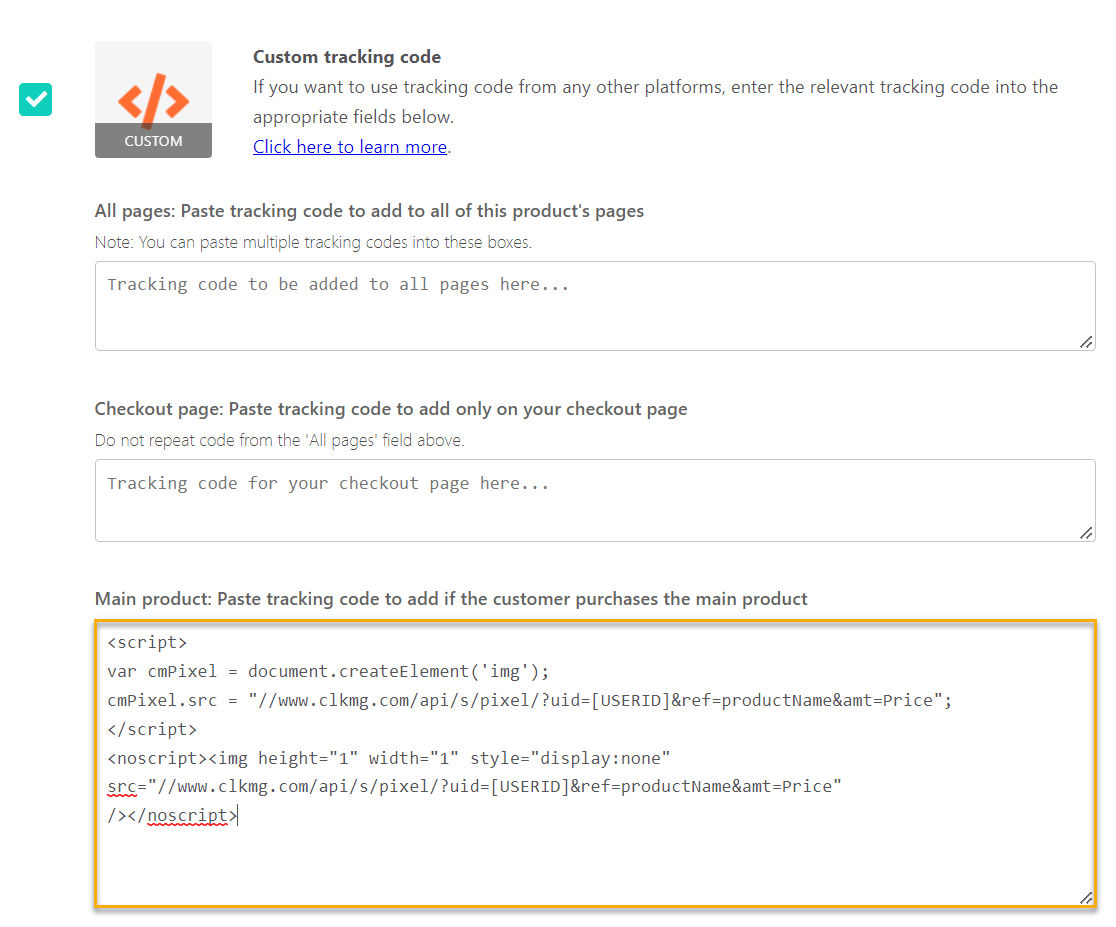
Your Sales Pixel:
<script>

var cmPixel = document.createElement('img');

cmPixel.src = "//www.clkmg.com/api/s/pixel/?uid=[USERID]&ref=productName&amt=Price";

</script>

<noscript><img height="1" width="1" style="display:none"

src="//www.clkmg.com/api/s/pixel/?uid=[USERID]&ref=productName&amt=Price"

/></noscript>
If you have upsells or downsells hosted on your own site, add the Sales Pixel above to the first page people see after placing an order.
For ThriveCart hosted upsell pages, use the following steps:
Launch the Upsell Editor inside of ThriveCart and add the "Custom HTML" block to your page.

Double click in the block and add the Sales Conversion Code given above.
Replace the
ref value and amount with the name and price of your front end offer.Step 2 - Tracking Your Upsells And Downsells
Head to your Upsells page inside of ThriveCart that features a list of all of your upsells.
Edit your upsell and head to the "Tracking" tab section and check the "Do you want to add tracking code..."
Paste in your Sales Logging code below:
<script>

    window.cmtools = {

        uid: '[USERID]',

        log_sale: '.button:price:productName',

    }

</script>

<script src='//cdn.clickmagick.com/misc/js/cmtools.js'></script>
You'll have to update your
price and productName values for the code to work.For example, if you sell a $97 upsell called Bugout Bag then your code will look like this:
<script>

    window.cmtools = {

        uid: '[USERID]',

        log_sale: '.button:97:bugoutbag',

    }

</script>

<script src='//cdn.clickmagick.com/misc/js/cmtools.js'></script>
Then, take the sales logging code above and add it to all of your upsells and downsells.
Note: Do not change the
.button portion of the code. ThriveCart buttons are in the button CSS class, so to track the clicks on the button the .button must be used.Step 3 – Create A Tracking Link For Your Sales Page
Create a Tracking Link using your Sales Page as the Primary URL:
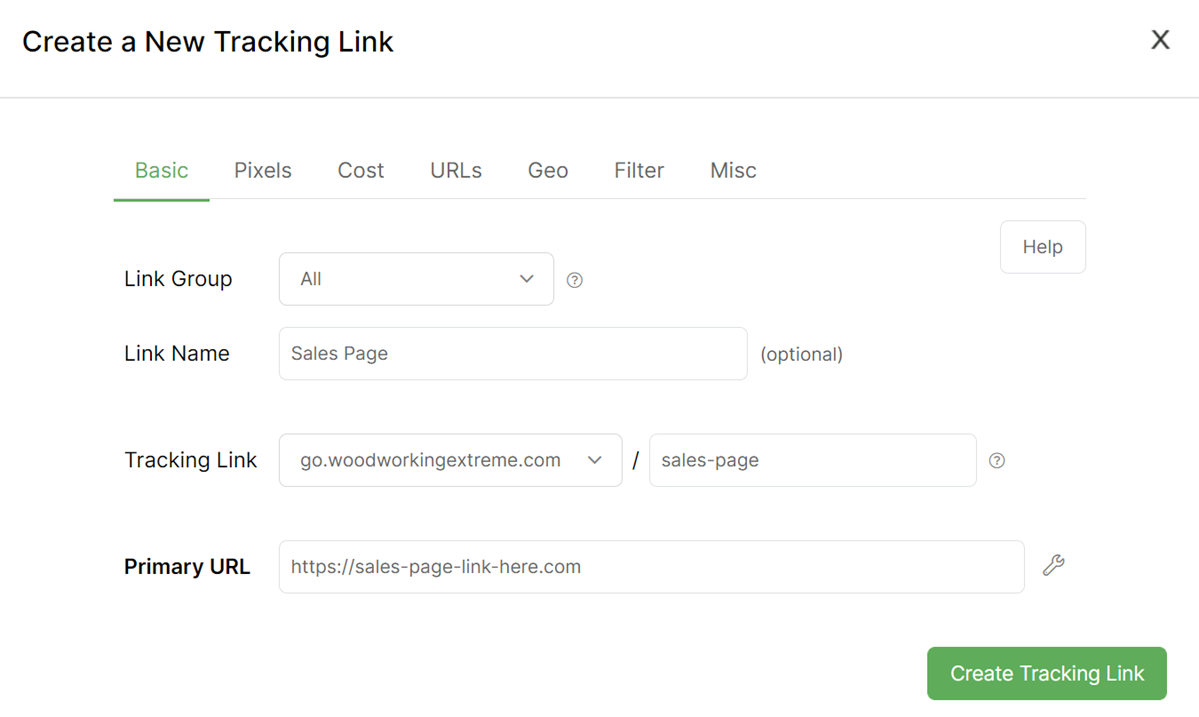
That it! Once you start sending traffic to the Tracking Link, your ThriveCart sales will be tracked in ClickMagick.
Article 596 Last updated: 04/08/2024 4:04:38 PM
https://www.clickmagick.com/kb/?article=596