|
How do I use Click Shield to reduce wasted ad spend?
Click Shield is a feature that’s guaranteed to reduce your Pay-Per-Click ad costs, with no change in conversions. These savings go straight to your bottom line, and if you’re doing any meaningful amount of PPC advertising this alone should more than pay for the cost of ClickMagick!
What Is Click Shield?
Studies show that about half of all Internet traffic is generated by “bots” and other automated systems, and unfortunately, a lot of these bots “click” on your various paid ads.
The ad networks like Google, Facebook and Microsoft say they try to prevent it, but they miss a lot. Besides, relying on them is like letting the fox guard the hen house…
It’s also very common for your competitors to drive your ad cost up (and conversion rate down) by repeatedly clicking on your ads. Or worse, hiring a “click farm” to do the dirty work for them.
In addition to bots and competitors, you may be surprised to learn that a lot of your prospects and even existing users or customers use Google search as “bookmarks.” Any time they want to return to your site they’ll search your brand name on Google and click the first thing that shows up at the top – which is usually your paid ad.
Again, the ad networks aren’t much help here. They use black-box algorithms, they don’t tell anyone how their systems handle this, and they will absolutely charge you for repeat clicks from the same user in a relatively short period of time in an unreasonable way that just wastes your money.
So to help you combat all of this, Campaigns offers something we call Click Shield.
Click Shield allows you to set up simple rules to define what type of paid click behavior is acceptable for your business, and what’s not e.g. Allow 2 clicks per week.
Anyone who violates these rules is added to a custom audience at your ad network, which is used to prevent these “abusers” from seeing your ads, so they can no longer click on them and waste your ad budget.
The end result is reduced ad costs with no change in conversions – money that goes straight back in your pocket.
How Does It Work?
From a technical standpoint, here’s how Click Shield works …
When you set up your Click Shield rules, each rule has an associated “Exclusion Page URL.”
This is the URL of a simple page you’ll need to create on your end, for the purpose of adding “abusers” to one or more ad network custom audiences you’ll set up for this purpose.
When an incoming click violates any of your Click Shield rules, the click will be instantly redirected to your Exclusion Page URL – which automatically adds that user to your custom “exclusion” audiences.
You can use the same Exclusion Page URL for all of your rules and all your Campaigns Projects, you could have a unique Exclusion Page for each and every rule, or whatever makes the most sense for your business.
Your Exclusion Pages can also contain any content you want, or they could simply redirect back to your main landing page after a few seconds just to give your ad network pixels a chance to load …
The only requirement is that you add the necessary custom audience tracking codes from your ad networks. Instructions on doing that are in the specific ad network tabs above. Other than that you can do whatever you want with your Exclusion Pages.
Click Shield is a feature that’s guaranteed to reduce your Pay-Per-Click ad costs, with no change in conversions. These savings go straight to your bottom line, and if you’re doing any meaningful amount of PPC advertising this alone should more than pay for the cost of ClickMagick!
This article is a step-by-step guide for setting up Click Shield for Google Ads.
1. In your page builder, create a brand new page. This will be your “Exclusion Page”. This is where Click Shield will send people who break the rules you set.
The overall idea is that you’ll have your Google Ads tag on this page, and anyone who lands on this page will be added to a custom audience. You’ll then exclude this audience from seeing your ads.
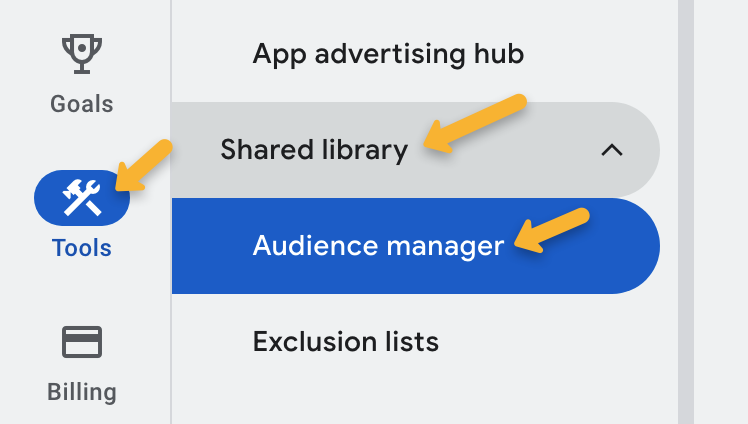
2. Go to your Google Ads dashboard, click on the Tools menu, then select “Shared Library” > “Audience Manager”.
3. Click on “Your Data Sources” at the top.
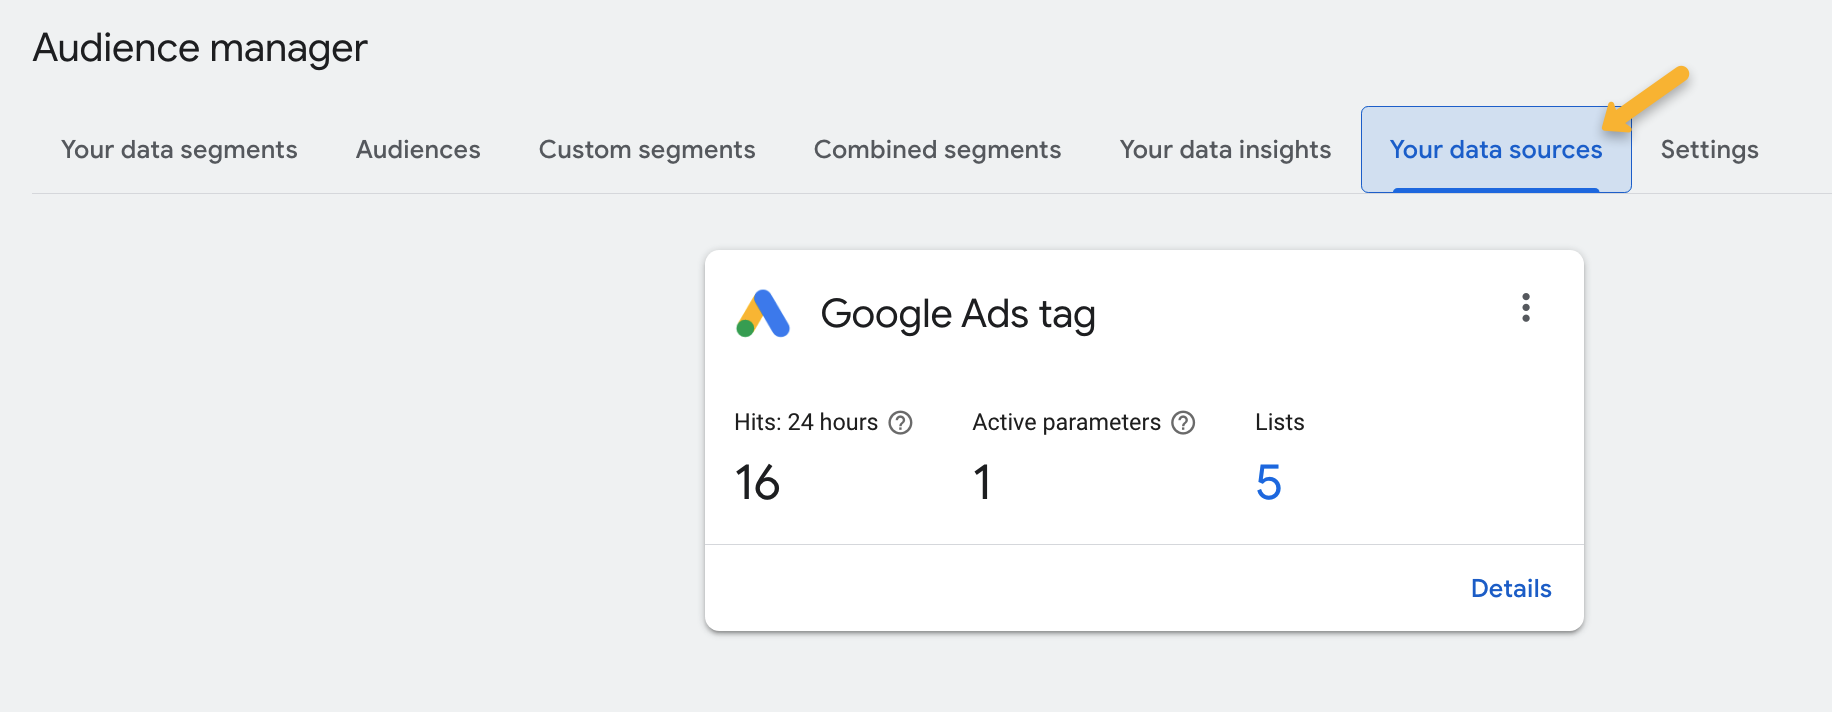
4. If you don’t already have anything added as a Data Source, add the Google Ads Tag as a Data Source.
5. Add the Google Ads Tag to the exclusion page you created earlier. This is so that Google knows who is landing on your exclusion page, and we can create an audience from those people.
Note: If you already have Google Tag Manager or Google Analytics installed on your site and it’s connected to your Google Ads account, you don’t need to add the Google Ads tag too.
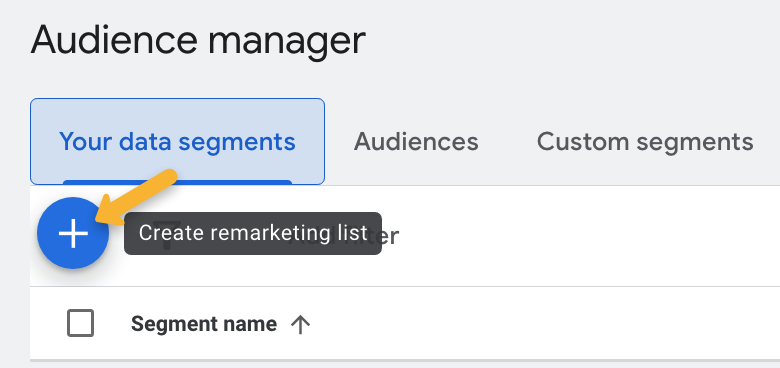
6. Once you have at least one data source listed, go to “Your data segments” on the left, then click the blue plus button to add a new remarketing list.
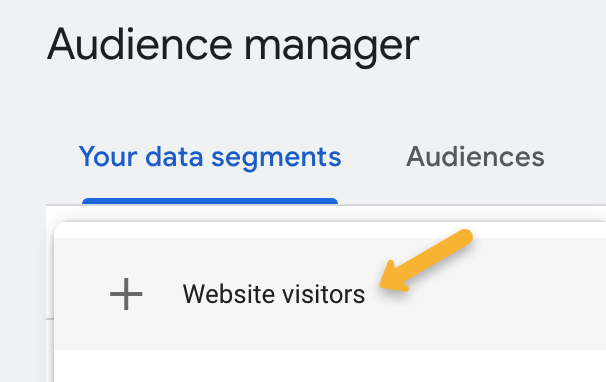
7. Choose “Website Visitors” as the type.
8. Make sure the name is something you’ll immediately identify as the list you’ll be using for excluding clicks with Click Shield. For the purpose of this training, we’ll call the list “Exclusion”.
9. For the action, leave it as “Web page visit” and click on the “Refine action” button on the right.

10. Set up the refinement to be “Page URL” for the first option, “contains” for the second option, and then add the URL of your exclusion page (which you should have already made to send filtered clicks to) in the text box, like this:

11. Click “Create Segment” at the bottom to create the new segment.
12. In Google Ads, go to “Campaigns”, then go to “Audiences, keywords and content” > “Audiences” on the left.
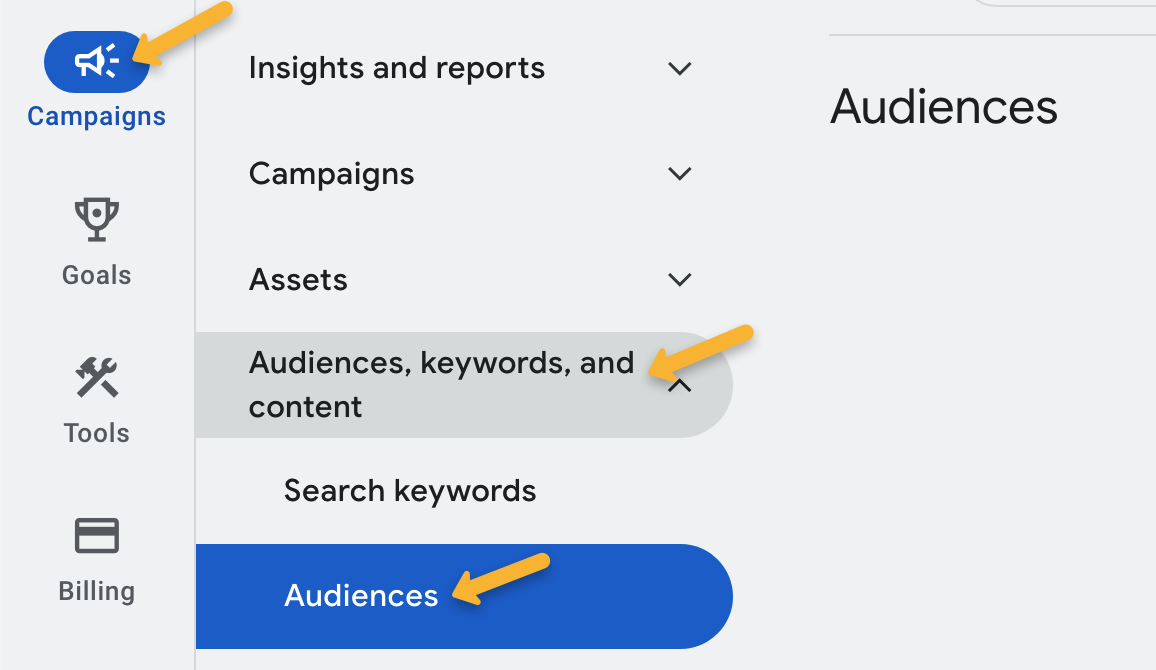
13. Down on the bottom of the page in the Exclusions section, click on “Add exclusions”.

14. Choose “Campaign” as the option, then choose the campaign you want to set the exclusion in.
15. Once the setup window pops up, select the Browse menu and choose “How they have interacted with your business”
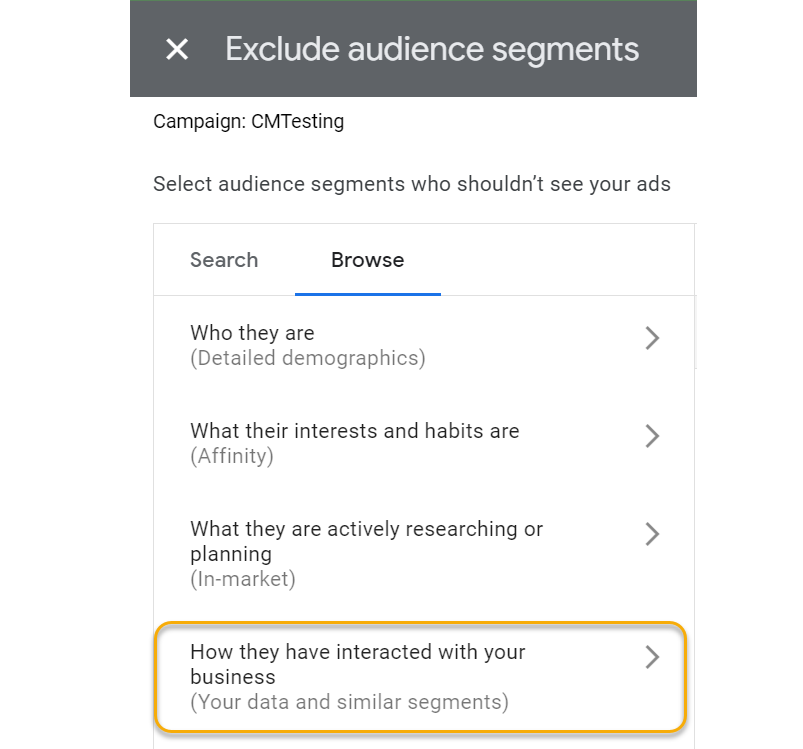
16. Choose “Website Visitors”, and then choose the custom list you created. In this case, we called it “Exclusion”.
If you see “1 selected” on the right side with your list shown there, then you did it right.
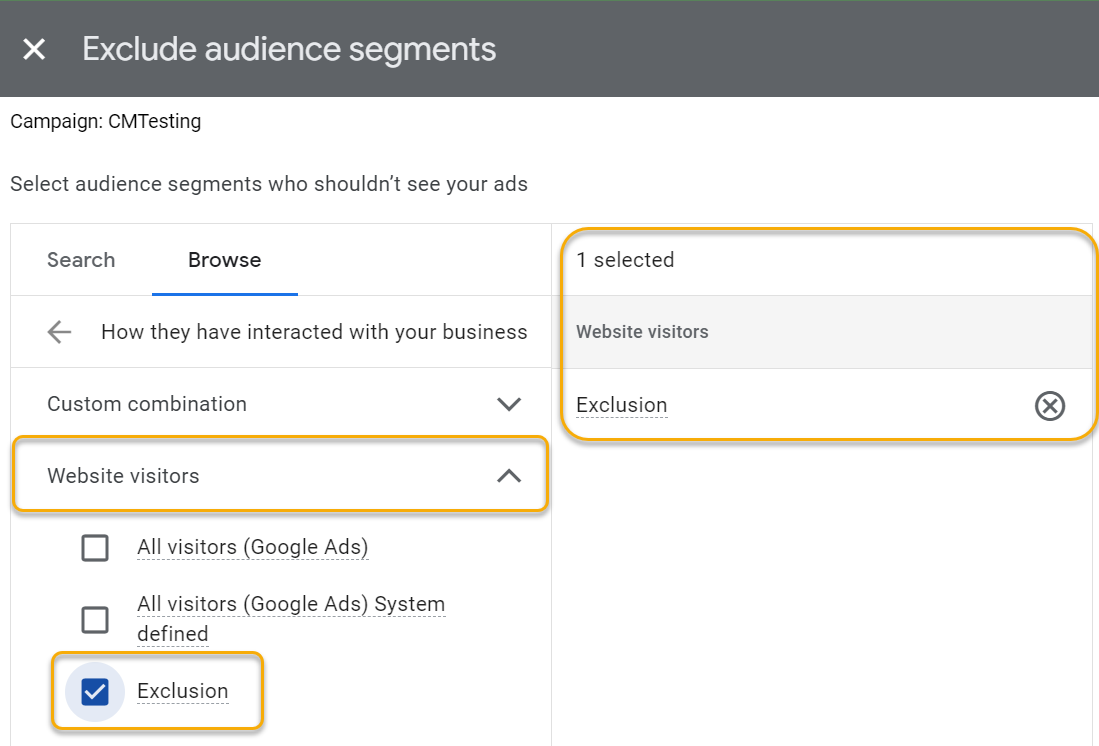
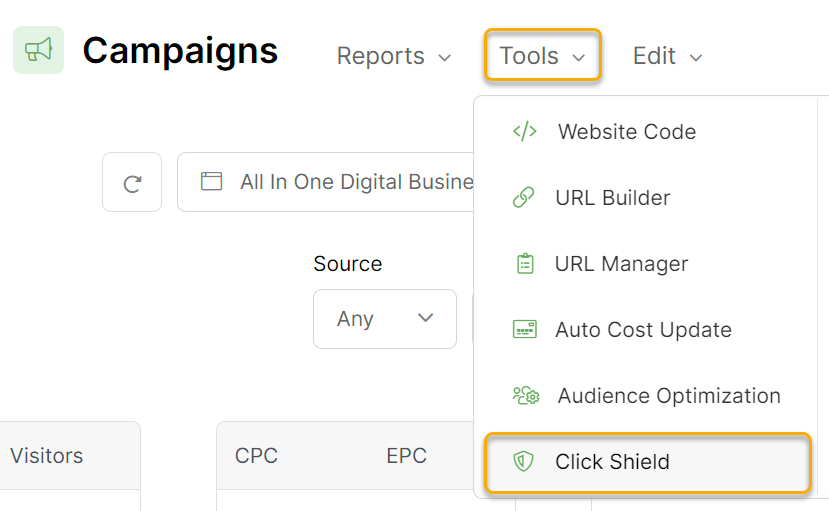
17. Now, go back to your ClickMagick Campaigns page, expand the Tools menu, and then click on “Click Shield”.
18. Click on the add rule button, and then fill in the details. Make sure to use the same URL in the box here as you did in your exclusion list you added in Google Ads.
For the other settings on how many clicks to allow in a specific time period, this is purely your preference. For this case, we chose 10 click every 10 minutes.
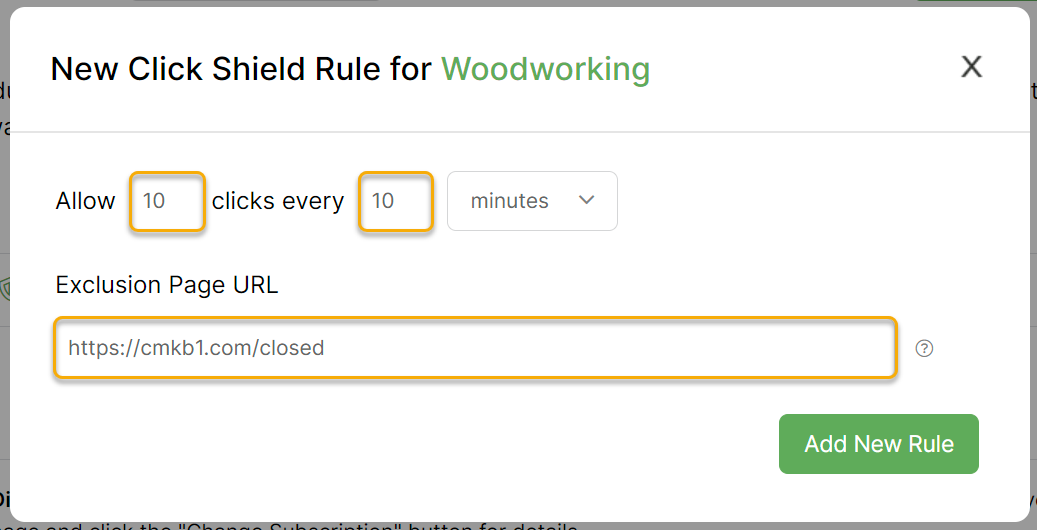
19. Click on “Add New Rule” and now you have a new rule set up with Click Shield to protect your campaign in Google Ads!
And that’s all there is to it. From this point on Click Shield is a “set and forget” type of thing, and it’ll just continue working for you in the background 24/7, 365 days a year to save you money.
We hope you enjoy this feature, and that it saves you a ton of money. If you have any suggestions on how we can make it even most useful please let us know!
To learn more about using Custom Audiences in Google Ads, visit their article below:
Google Ads – About custom audiences
Click Shield is a feature that’s guaranteed to reduce your Pay-Per-Click ad costs, with no change in conversions. These savings go straight to your bottom line, and if you’re doing any meaningful amount of PPC advertising this alone should more than pay for the cost of ClickMagick!
This article is a step-by-step guide for setting up Click Shield for Facebook Ads.
In order for this to work, you’ll need to have at least one Facebook (Meta) Pixel set up and installed on every page in your website. You can review the steps on how to do this below if need be. Otherwise, move on to the first step to creating your custom audience.
How to create a Facebook (Meta) Pixel for your website or funnel
How to Create a Custom Audience for Exclusions
1. Go to your Meta Business Manager dashboard, then click on “Audiences” on the left, then click on “Create a Custom Audience”.
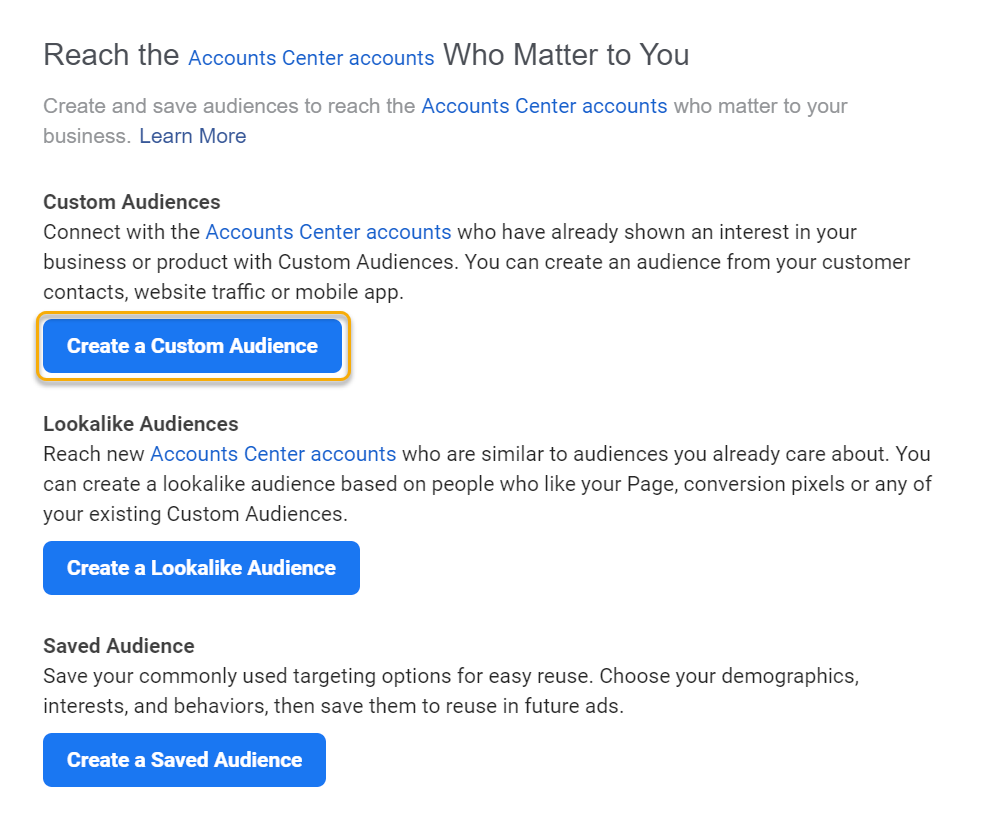
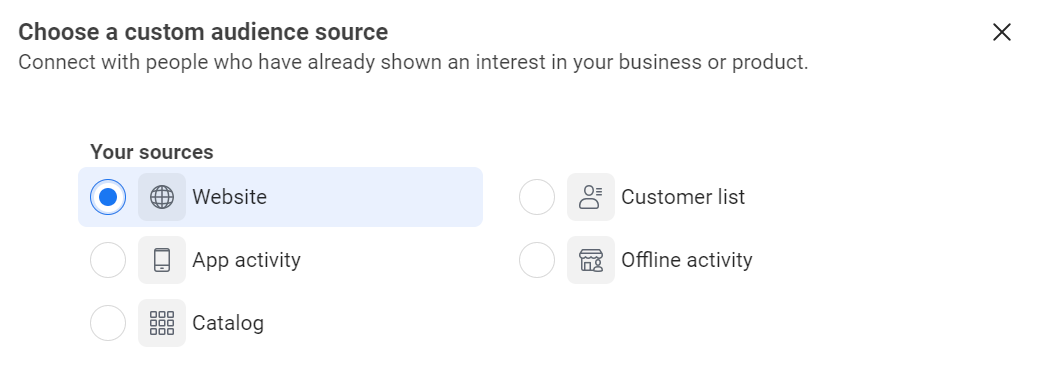
2. Choose “Website” as the source you want to collect information from.
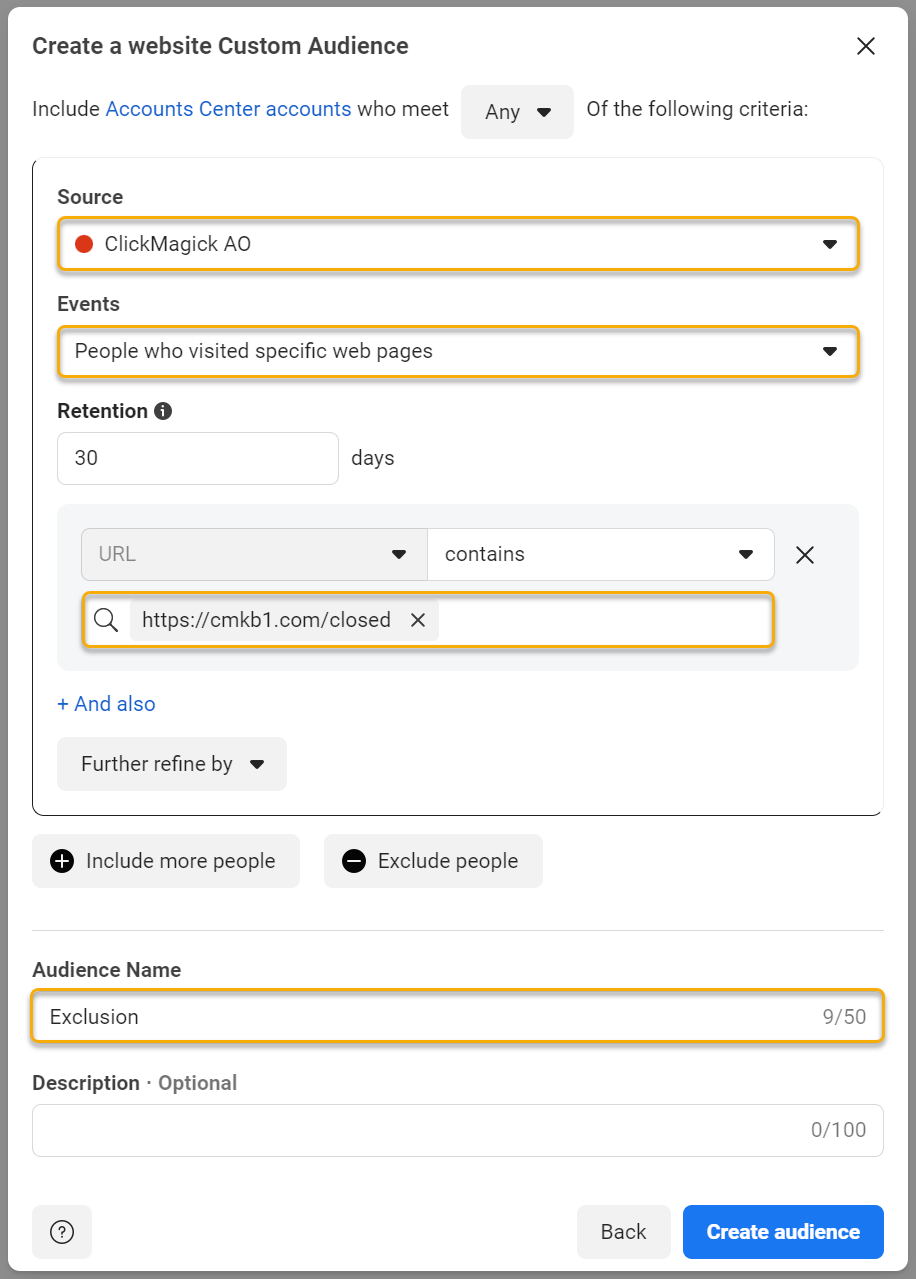
3. Choose the source you would like to use, choose “People who visited specific web pages”, and then add the URL of your exclusion page in the box. Lastly, give the audience a name and click “Create Audience”.
4. Now you’ll need to associate this audience with an ad. With Facebook (Meta) Ads, you can associate the audience either to an existing campaign, or to a new one upon creation.
During ad creation, you’ll be prompted to select an audience and any exclusions. For this walkthrough, we will show you how to exclude this audience on an existing ad.
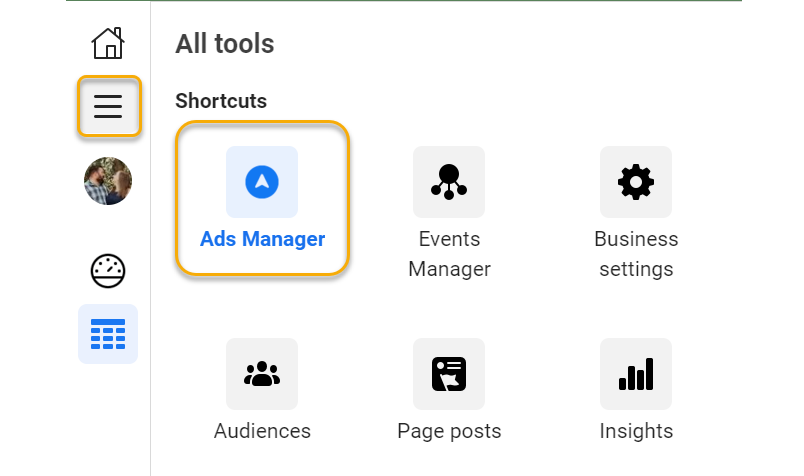
5. Go to the Campaigns Dashboard in Meta Business Manager by clicking the three lines above your profile picture on the left, then click on “Ads Manager”.
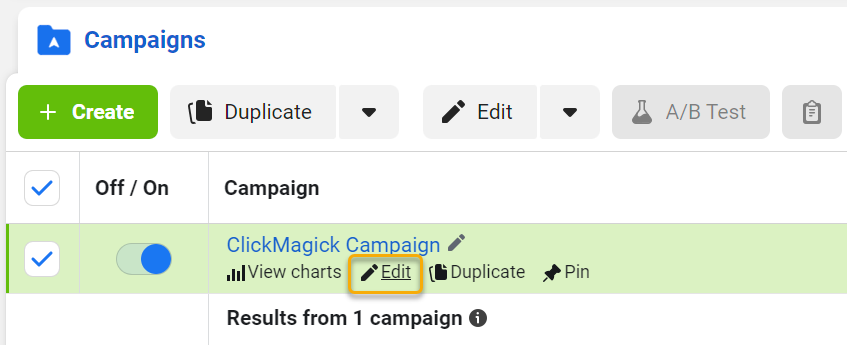
6. Find the campaign you would like to edit from the list, hover your mouse over the campaign, and click the “Edit” button underneath it.
7. Click on the ad set from the list on the left (most likely the middle option if you only have one ad as part of the set).

8. Scroll down in the ad set settings until you find the “Audience” section. Here you will see a box underneath where it says “Custom Audiences”. Click in the empty box underneath the “EXCLUDE” section (you may have to click the “Exclude” button for it to show).
Select the custom audience you created from the list:

9. Click “next” to get to the Ad editor and make any changes you need to the ad (if any) and then click “Publish”.
Note: Your ad will likely go back through a review period. This is normal. Updating an audience generally will not cause an ad to get rejected, so if your ad was approved and then now it is rejected, review the information in the ad to make sure it follows their guidelines. Any questions about the ad itself should be directed to Facebook/Meta.
Now you’re finished with the Facebook (Meta) Ads portion and can move on to the setup in ClickMagick.
10. Go back to your ClickMagick Campaigns page, expand the Tools menu, and then click on “Click Shield”.

11. Click on the “Add Rule” button, and then fill in the details. Make sure to use the same URL in the box here as you did in your custom audience you added in Facebook (Meta) Ads.
For the other settings on how many clicks to allow in a specific time period, this is purely your preference. For this case, we chose 10 click every 10 minutes.

12. Click on “Add New Rule” and now you have a new rule set up with Click Shield to protect your campaign in Facebook (Meta) Ads!
Note: It can take up to 24 hours for your pixel to pick up enough data to provide to your custom audience. If your pixel is not picking up data, but you know you’ve had visits to your site, please go through the pixel setup process again and make sure the pixel is installed on every page of your website or funnel.
If you have any questions regarding Facebook (Meta) Pixels, you can review our FAQ here:
What are some frequently asked questions about Facebook pixels?
To learn more about using Custom Audiences in Facebook (Meta) Ads, visit their article below:
Facebook - About Custom Audiences
Click Shield is a feature that’s guaranteed to reduce your Pay-Per-Click ad costs, with no change in conversions. These savings go straight to your bottom line, and if you’re doing any meaningful amount of PPC advertising this alone should more than pay for the cost of ClickMagick!
This article is a step-by-step guide for setting up Click Shield for Microsoft Ads.
Step 1 – Create a UET Tag in Microsoft Ads (skip to step 2 if you already have one)
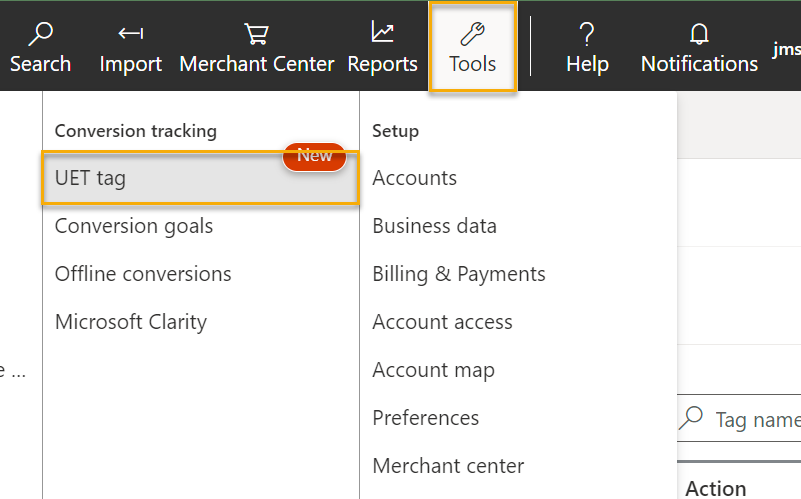
1. Go to your Microsoft Ads dashboard, click on the Tools menu, and then select “UET Tag”.
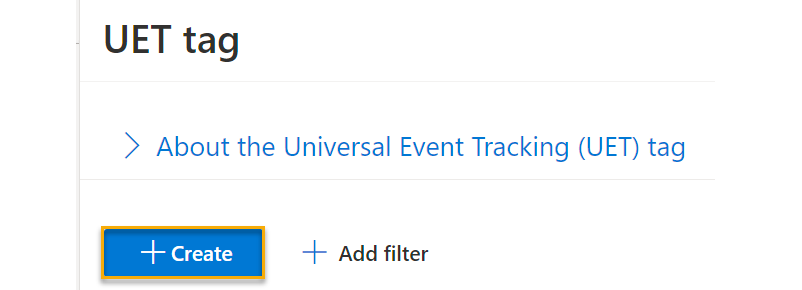
2. If you don’t already have a UET Tag listed here, click the “Create” button to create a UET Tag.
3. Give the tag a name and a description, and then choose how you would like to install the tag.
4. Install the tag on all of your pages for your website or funnel, usually in the “Head” or “Header” portion.
To learn more about the Microsoft Ads UET Tag, review the article below.
Microsoft – What is UET and how can it help me?
Step 2 – Create Your Exclusion Page and Custom Audience
1. Once you have at least one UET Tag created, create a brand new page with your page builder.
This new page will be your “Exclusion Page”. This is where Click Shield will send people who break the rules you set.
The overall idea is that you’ll have your Microsoft Ads UET tag on this page, and anyone who lands on this page will be added to a custom audience. You’ll then exclude this audience from seeing your ads.
2. Click on the Tools menu again and then click on “Audiences”.
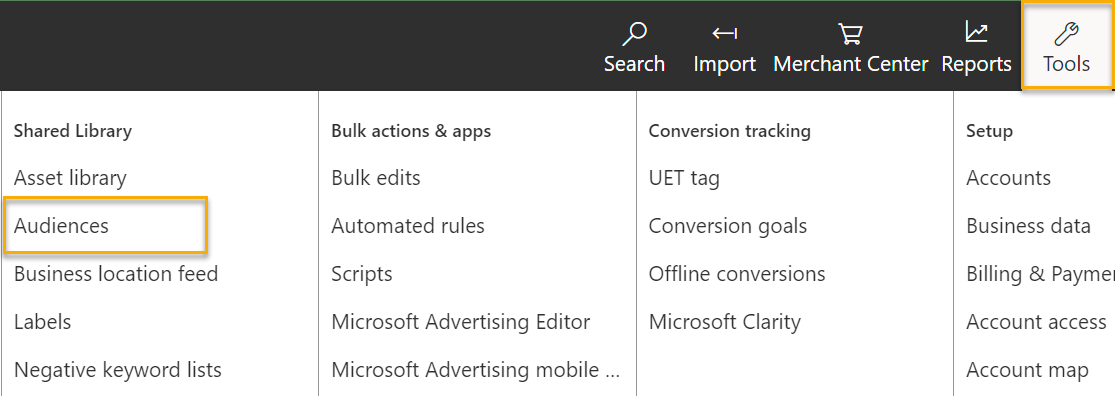
3. Click the blue “Create” button to create a new audience.
4. Give your new audience a name, and then choose “Remarketing List”.
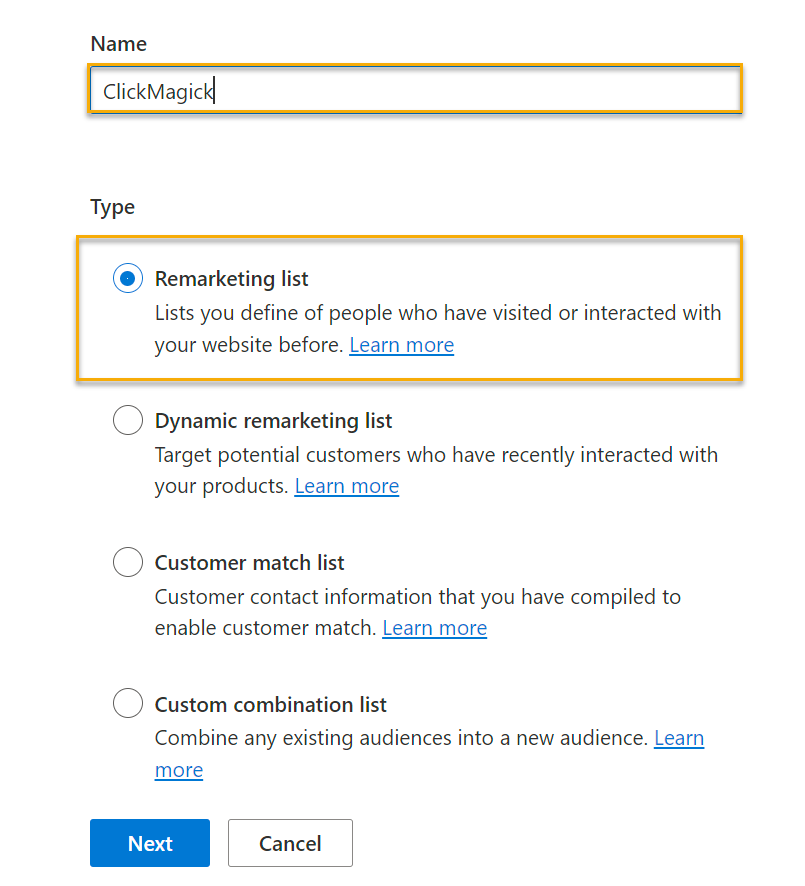
Make sure you name this something memorable because you’ll need to pick up on this later and you want to make sure you pick the right audience in later steps.
5. On the next page, make sure to choose the correct tag that you want to use with this audience (if you just created one, it will be the only one available to choose).
Then, choose “Visitor of a page” for whom to add to your audience.
And lastly, add in the URL for your exclusion page in the empty box to the right of “contains”.
Once finished, it should look something like this:
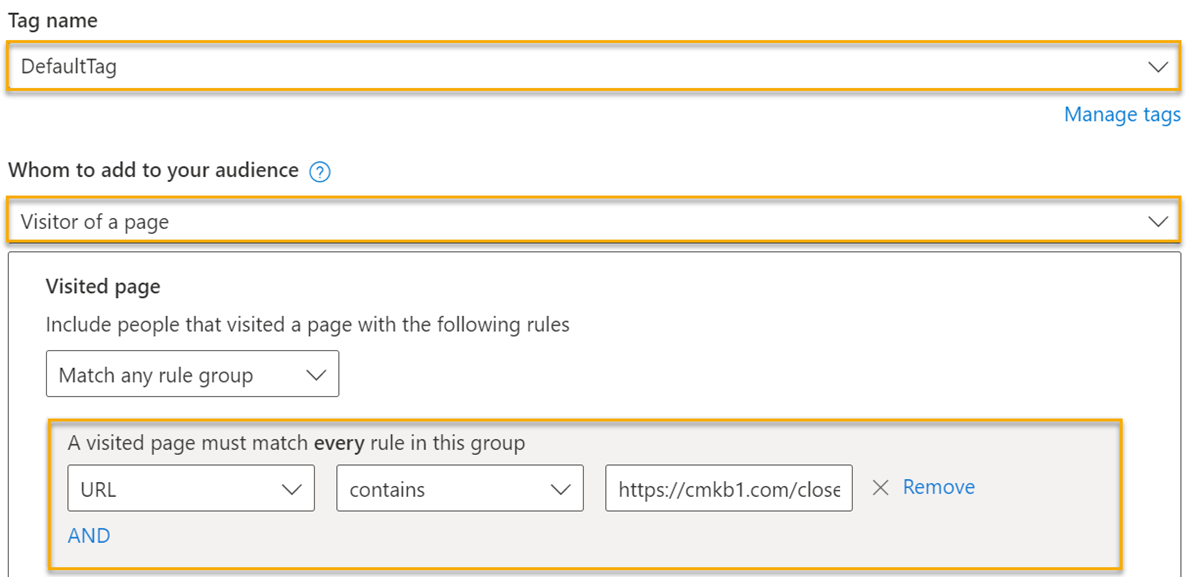
6. Now you need to associate this audience with a campaign. The easiest way to get there is within the box at the top that says “Associate audiences with ad groups or campaigns”. In that box, click on the link that reads “Campaigns page – Audiences tab”.

7. Click “Create Association” to connect this audience to a campaign.
8. Select Campaign from the dropdown, and then choose the campaign you would like to associate this audience with.
9. Inside of “Campaign exclusions”, click the blue “Add Exclusion” and choose Remarketing lists.
Then, choose the remarketing list (by clicking the blue plus (+) button to the right of it) so that it shows “Selected: 1” on the right hand side.
Once finished, your association creation page should look like this:
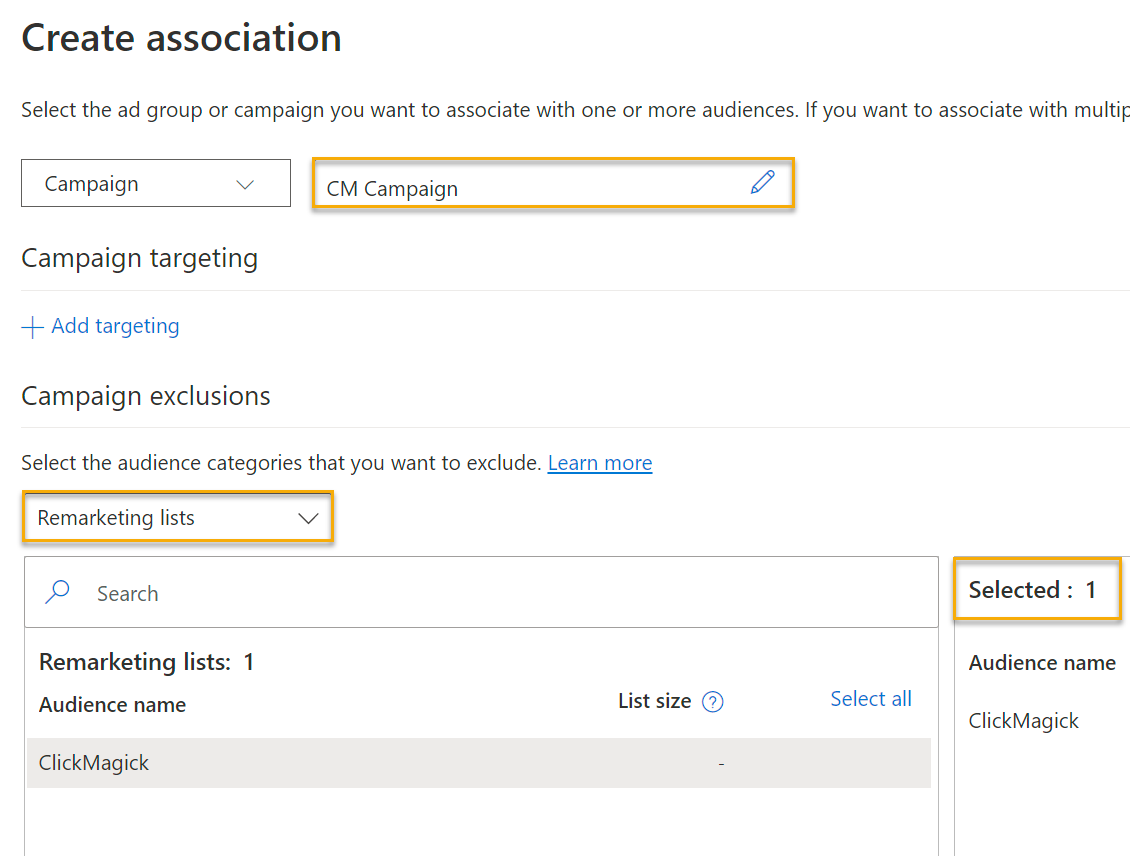
10. Save the page, and you’re finished with this portion in Microsoft Ads.
11. Now, go back to your ClickMagick Campaigns page, expand the Tools menu, and then click on “Click Shield”.

12. Click on the “Add Rule” button, and then fill in the details. Make sure to use the same URL in the box here as you did in your remarketing list you added in Microsoft Ads.
For the other settings on how many clicks to allow in a specific time period, this is purely your preference. For this case, we chose 10 click every 10 minutes.

13. Click on “Add New Rule” and now you have a new rule set up with Click Shield to protect your campaign in Microsoft Ads!
And that’s all there is to it. From this point on Click Shield is a “set and forget” type of thing, and it’ll just continue working for you in the background 24/7, 365 days a year to save you money.
We hope you enjoy this feature, and that it saves you a ton of money. If you have any suggestions on how we can make it even most useful please let us know!
To learn more about using Custom Audiences in Microsoft Ads, visit their article below:
Microsoft - About Custom Audiences
Click Shield is a feature that’s guaranteed to reduce your Pay-Per-Click ad costs, with no change in conversions. These savings go straight to your bottom line, and if you’re doing any meaningful amount of PPC advertising this alone should more than pay for the cost of ClickMagick!
This article is a step-by-step guide for setting up Click Shield for TikTok Ads.
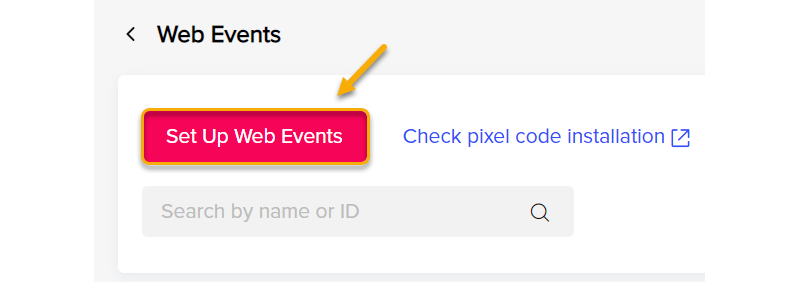
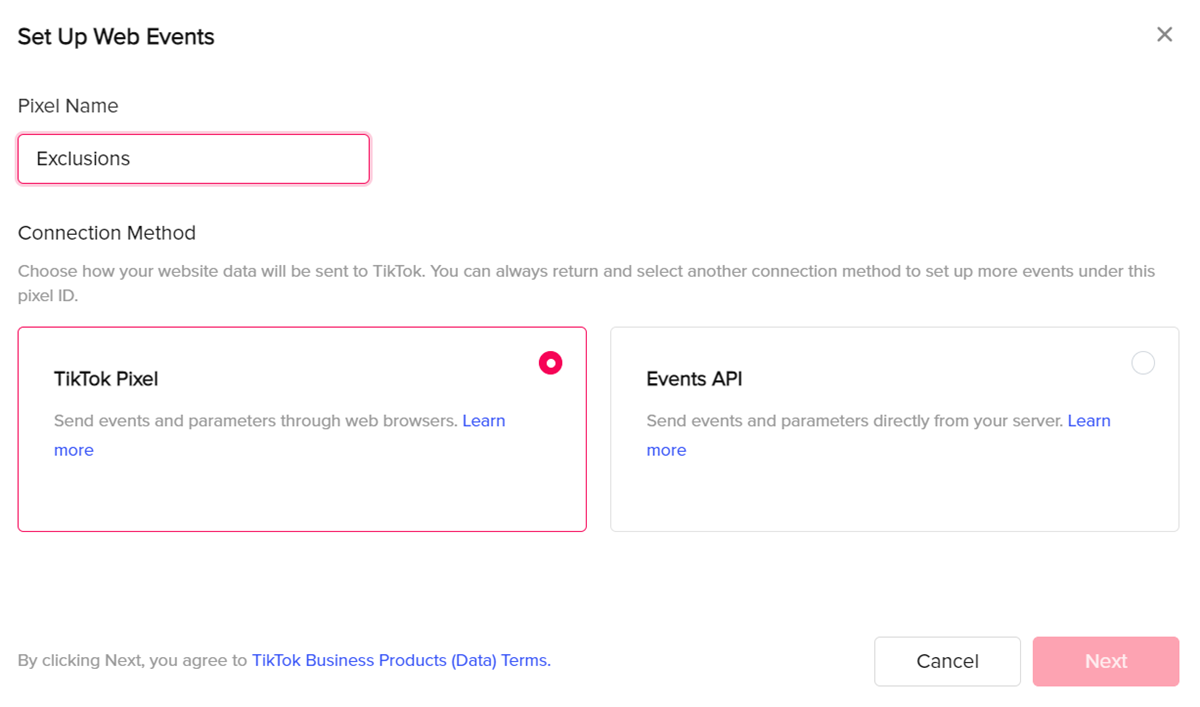
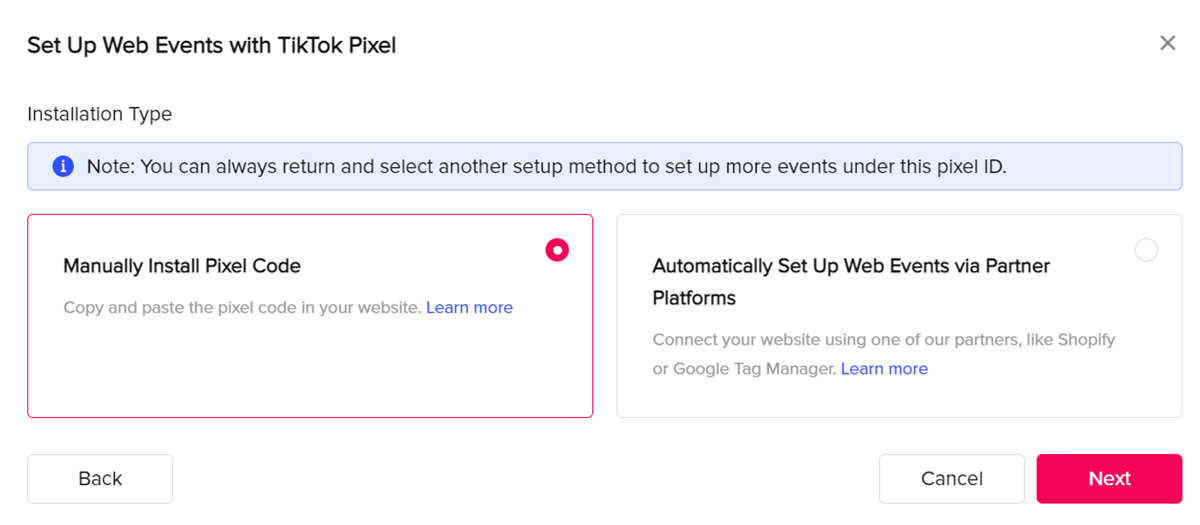
In order for this to work, you’ll need to have your TikTok Pixel set up and installed. However, this one is different from the rest because TikTok does not give you the ability to specify a URL in the audience creation process. So, you need to create a completely separate pixel and place it only on the exclusion page for this to work properly. You can review the steps on how to do this below if need be. Otherwise, move on to the first step to creating your custom audience.
How to create a TikTok Pixel for your exclusion page in your funnel
How to Create a Custom Audience for Exclusions
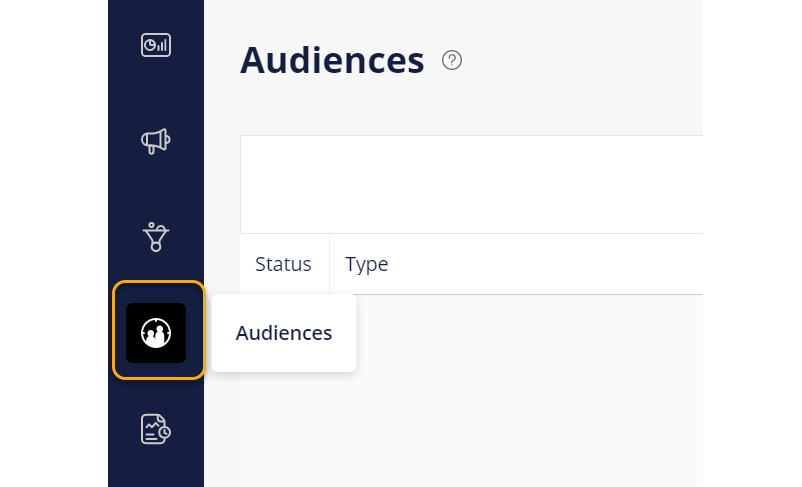
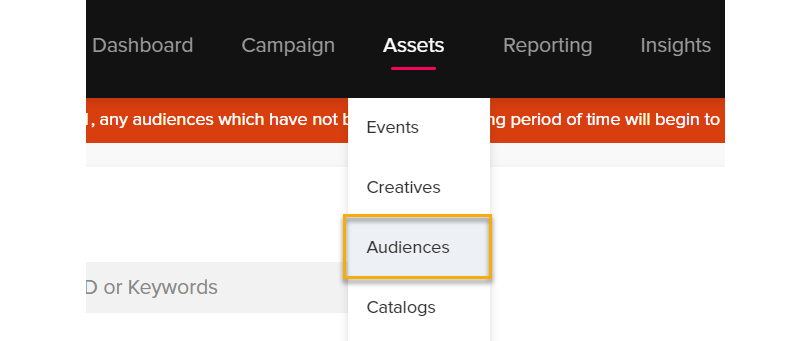
1. Go to your TikTok Ads dashboard, expand the Assets menu and then click on “Audiences”.
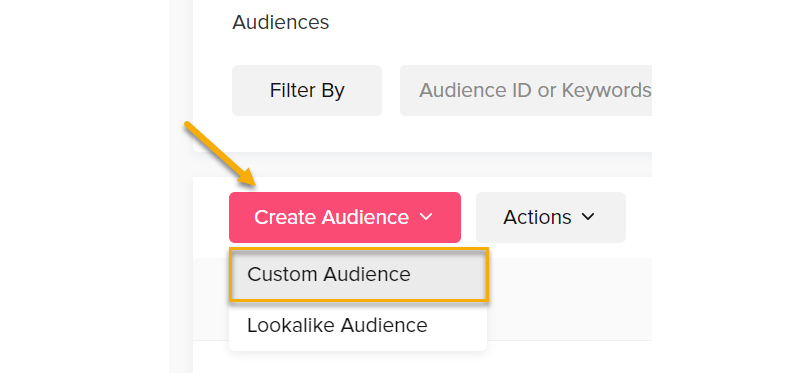
2. Click on the red “Create Audience” button and then select “Custom Audience”.
3. Choose “Website Traffic” as the type.
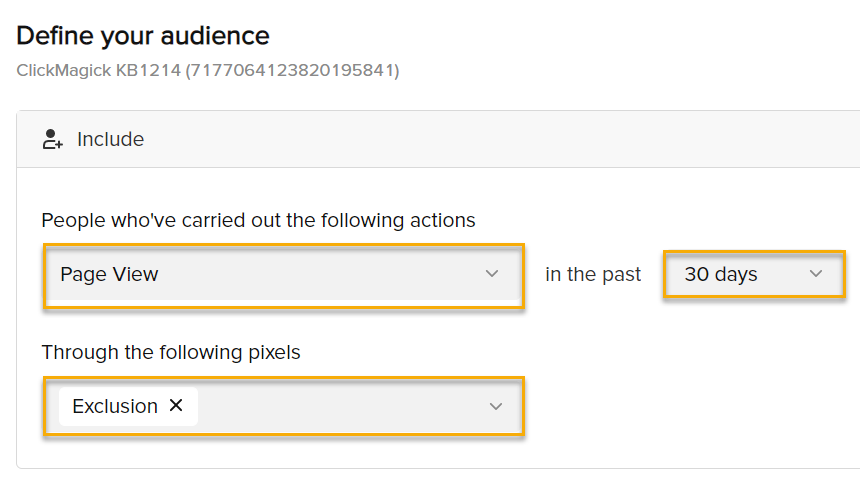
4. Use “Page View” as the action type, give it a time frame that fits your style, and then choose the Pixel you set up on your exclusion page.
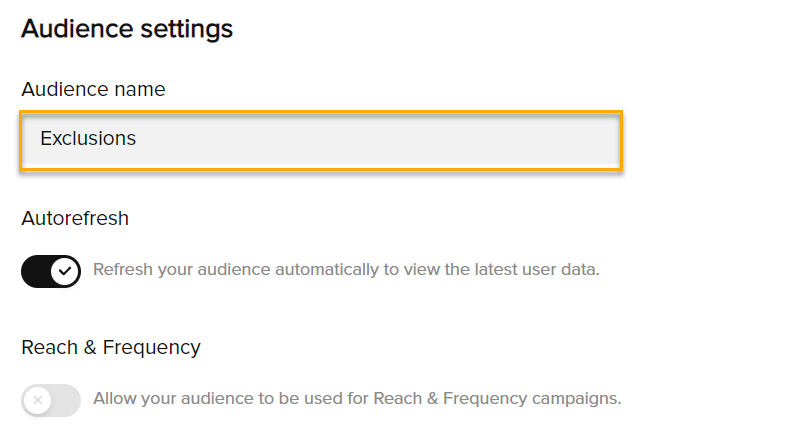
5. Give the custom audience a name, and then click Confirm.
Now we can move on to adding the audience exclusion in the campaign.
Note: It can take up to 24 hours for your new custom audience to be ready to be used. It also needs to have some sort of traffic to the page for it to create the audience properly. So, if you aren’t able to add it to your campaign, make sure the pixel is installed properly, give your exclusion page some traffic, and then wait at least 24 hours and try again.
6. When creating your campaign, you’ll be brought to a page where you’re setting up the ad group. Scroll down to find the “Audience” section, and add your new custom audience to the “Exclude” box.
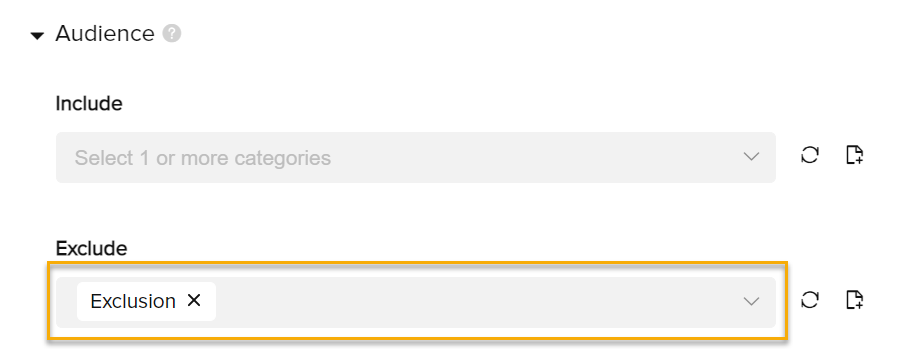
Continue with the rest of the campaign creation, and now you’re finished with the TikTok Ads portion and can move on to the setup in ClickMagick.
7. Go back to your ClickMagick Campaigns page, expand the Tools menu, and then click on “Click Shield”.

8. Click on the “Add Rule” button, and then fill in the details. Use the URL for your exclusion page, the same one you installed the TikTok Pixel on.
For the other settings on how many clicks to allow in a specific time period, this is purely your preference. For this case, we chose 10 click every 10 minutes.

9. Click on “Add New Rule” and now you have a new rule set up with Click Shield to protect your campaign in TikTok Ads!
And that’s all there is to it. From this point on Click Shield is a “set and forget” type of thing, and it’ll just continue working for you in the background 24/7, 365 days a year to save you money.
We hope you enjoy this feature, and that it saves you a ton of money. If you have any suggestions on how we can make it even most useful please let us know!
To learn more about using Custom Audiences in TikTok, visit their article below:
TikTok – About custom audiences
Click Shield is a feature that’s guaranteed to reduce your Pay-Per-Click ad costs, with no change in conversions. These savings go straight to your bottom line, and if you’re doing any meaningful amount of PPC advertising this alone should more than pay for the cost of ClickMagick!
This article is a step-by-step guide for setting up Click Shield for Pinterest Ads.
In order for this to work, you’ll need to have your Pinterest Pixel set up and installed on every page in your website. You can review the steps on how to do this below if need be. Otherwise, move on to the first step to creating your custom audience.
How to create a Pinterest Pixel for your Website or funnel
How to Create a Custom Audience for Exclusions
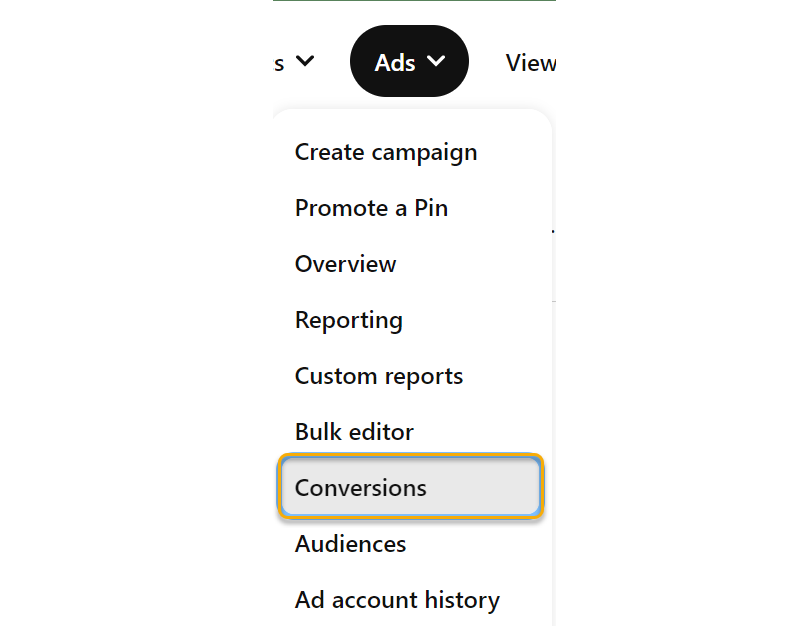
1. Go to your Pinterest Ads dashboard, expand the Ads menu and then click on “Audiences”.
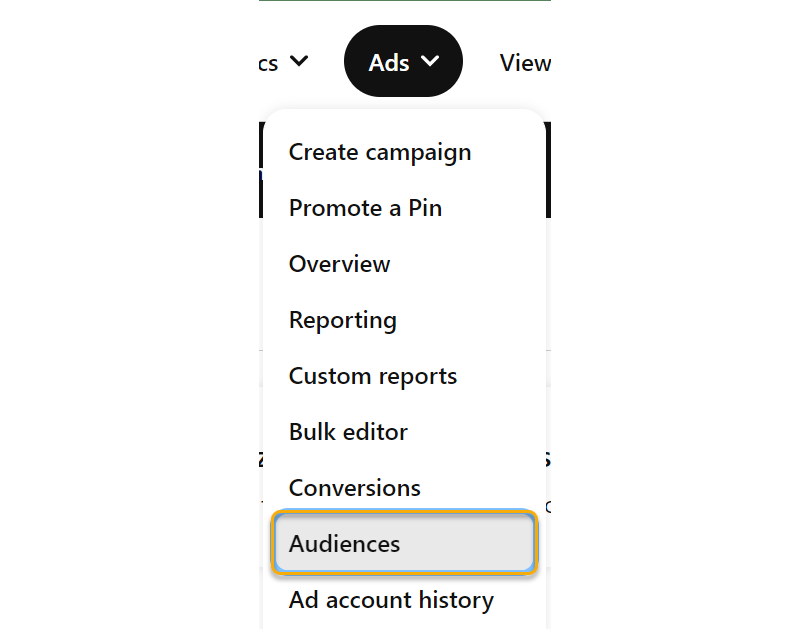
2. Click on the red “Create Audience” button on the right to start the creation process.
3. Choose “Site Visitors” as the type, and then give your audience a memorable name.

Note: You’ll notice the warning stating it can take up to 24 hours. That’s standard for new custom audiences in Pinterest Ads. You’ll see this again later in this article and it is their notice to you that it can take up to 24 hours to initialize. This is normal and not related to any missed step or anything you did wrong. If you already had a custom audience created previously, you likely will not see this warning.
4. Pick which ever conversion source you want to use. Most likely it will be Pinterest Tag, but it depends on how you have your tracking set up for Pinterest. For this article, we’re using the Pinterest Tag.
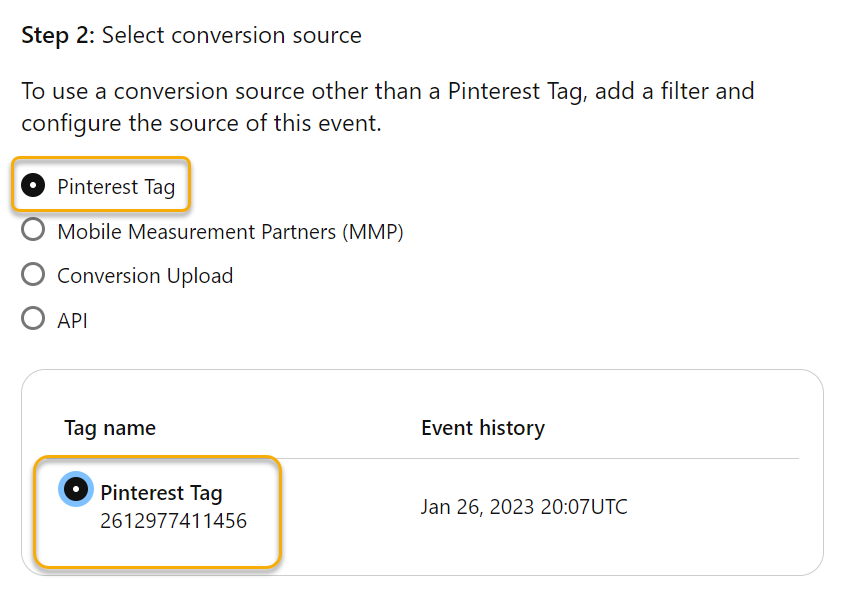
5. Choose whether or not you would like to have past data included, and give it a number of days to include data from.
Then, in the optional filters you will want to pick “Destination URL”, “Contains”, and then add your exclusion page URL in the box.
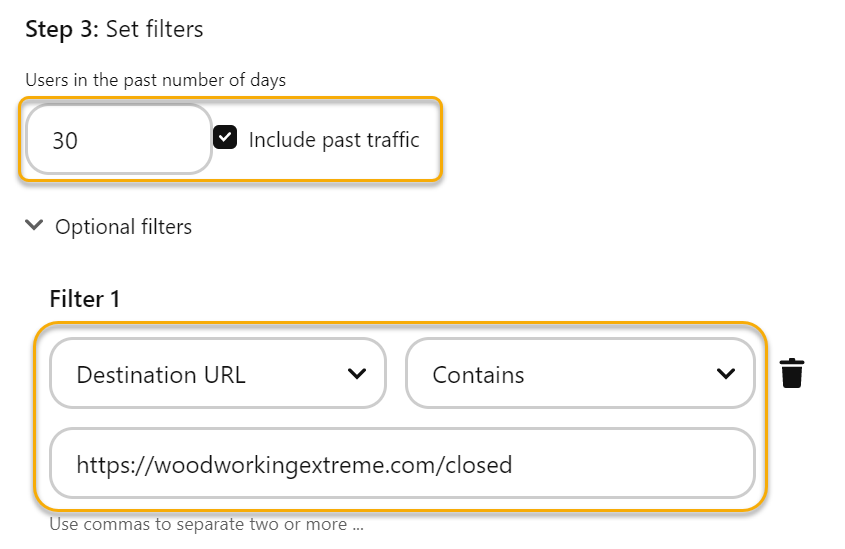
Click the create button to finish the creation of the custom audience, and now we can move on to adding the audience exclusion in the campaign.
6. When creating your campaign, you’ll be taken through some steps to go through the settings (For this article, we chose the “Manual” option for the campaign).
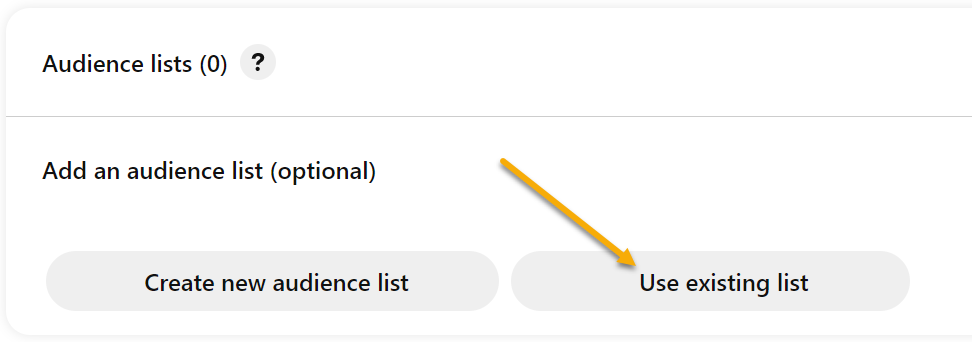
Through the steps, you’ll be brought to a page called “Targeting Details”. Find the section that says “Audience Lists” and choose “Use existing list” from that section.
7. Choose the “Site Visitors” option, and choose your custom audience that you just created. Then, choose “Exclude list” underneath that list.
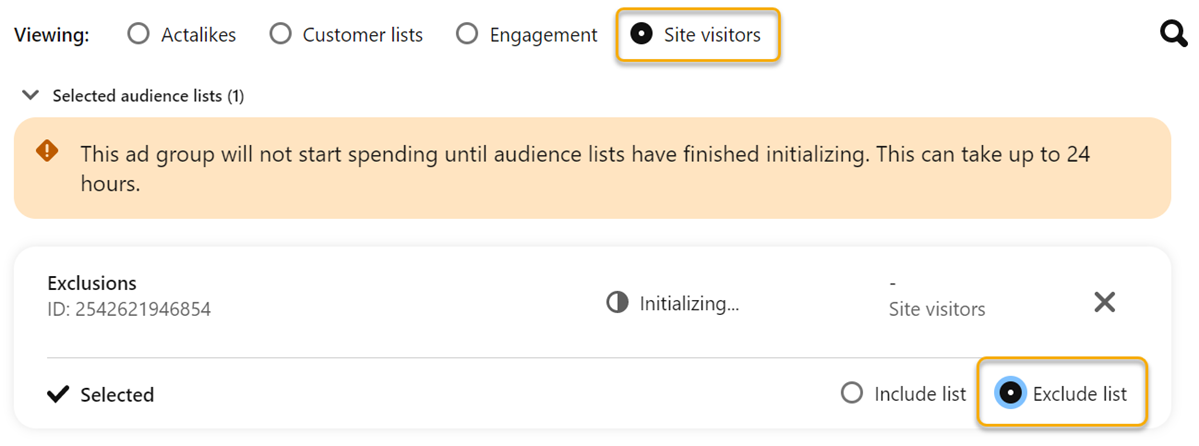
Continue with the rest of the campaign creation, and now you’re finished with the Pinterest Ads portion and can move on to the setup in ClickMagick.
8. Go back to your ClickMagick Campaigns page, expand the Tools menu, and then click on “Click Shield”.

9. Click on the “Add Rule” button, and then fill in the details. Make sure to use the same URL in the box here as you did in your custom audience you added in Pinterest Ads.
For the other settings on how many clicks to allow in a specific time period, this is purely your preference. For this case, we chose 10 click every 10 minutes.

10. Click on “Add New Rule” and now you have a new rule set up with Click Shield to protect your campaign in Pinterest Ads!
And that’s all there is to it. From this point on Click Shield is a “set and forget” type of thing, and it’ll just continue working for you in the background 24/7, 365 days a year to save you money.
We hope you enjoy this feature, and that it saves you a ton of money. If you have any suggestions on how we can make it even most useful please let us know!
To learn more about using Custom Audiences in Pinterest, visit their article below:
Pinterest – About custom audiences
Click Shield is a feature that’s guaranteed to reduce your Pay-Per-Click ad costs, with no change in conversions. These savings go straight to your bottom line, and if you’re doing any meaningful amount of PPC advertising this alone should more than pay for the cost of ClickMagick!
This article is a step-by-step guide for setting up Click Shield for Taboola Ads.
In order for this to work, you’ll need to have at least one Taboola Pixel set up and installed on every page in your website. You can review the steps on how to do this below if need be. Otherwise, move on to the first step to creating your custom audience.
How to create a Taboola Pixel for your website or funnel
How to Create a Custom Audience for Exclusions
1. Go to your Taboola Ads dashboard, then click on “Audiences”

2. Click on the button “New Audience” to create the custom audience.

3. Choose the option “Taboola Pixel Audience” and click continue.

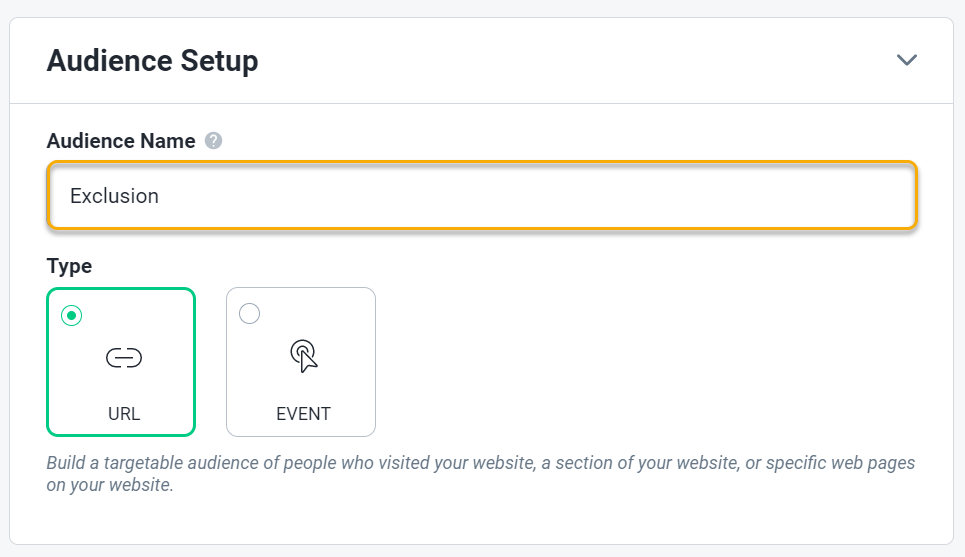
4. Give your new audience a name, and select URL as the type.
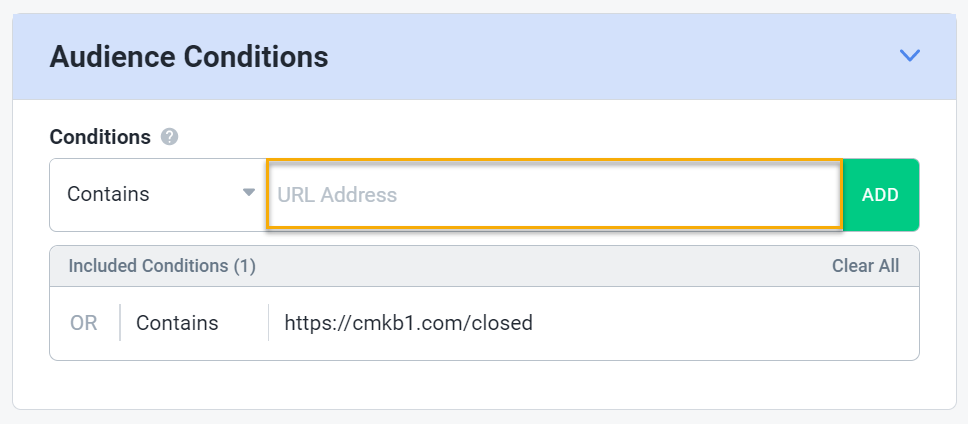
5. For the audience conditions, add the URL of your exclusion page to the box and click on the “Add” button. If done correctly, it should look something like this.
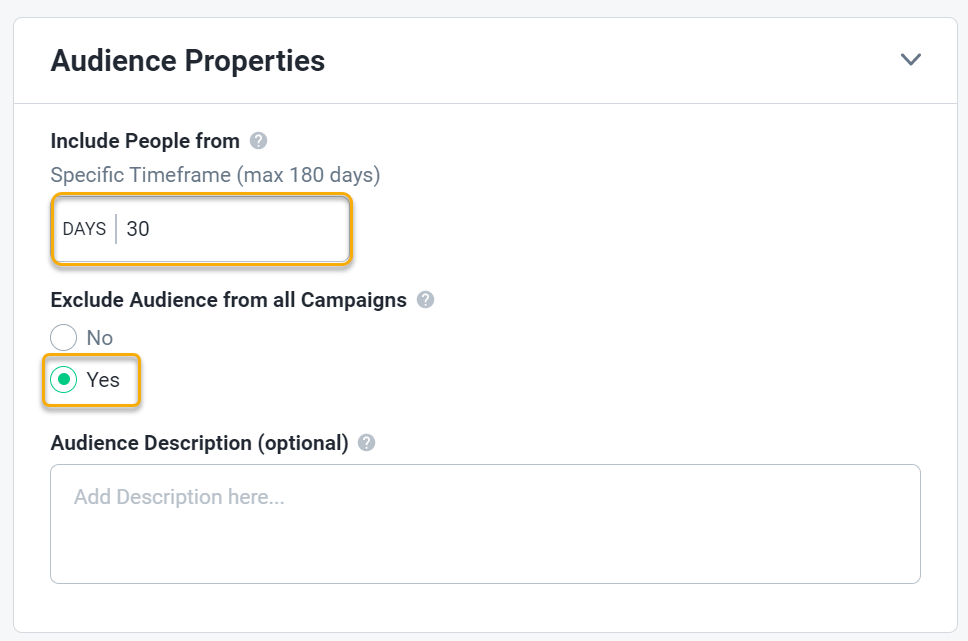
6. Set the time frame you want to included people (The default is 30 days, but you can set any number up to 180), and then change “Exclude audience from all campaigns” to YES.
Now you’re finished with the Taboola Ads portion and can move on to the setup in ClickMagick.
10. Go back to your ClickMagick Campaigns page, expand the Tools menu, and then click on “Click Shield”.

11. Click on the “Add Rule” button, and then fill in the details. Make sure to use the same URL in the box here as you did in your custom audience you added in Taboola Ads.
For the other settings on how many clicks to allow in a specific time period, this is purely your preference. For this case, we chose 10 click every 10 minutes.

12. Click on “Add New Rule” and now you have a new rule set up with Click Shield to protect your campaign in Taboola Ads!
And that’s all there is to it. From this point on Click Shield is a “set and forget” type of thing, and it’ll just continue working for you in the background 24/7, 365 days a year to save you money.
We hope you enjoy this feature, and that it saves you a ton of money. If you have any suggestions on how we can make it even most useful please let us know!
To learn more about using Custom Audiences in Taboola, visit their article below:
Taboola – About custom audiences
Click Shield is a feature that’s guaranteed to reduce your Pay-Per-Click ad costs, with no change in conversions. These savings go straight to your bottom line, and if you’re doing any meaningful amount of PPC advertising this alone should more than pay for the cost of ClickMagick!
This article is a step-by-step guide for setting up Click Shield for Outbrain Ads.
In order for this to work, you’ll need to have your Outbrain Pixel set up and installed on every page in your website. You can review the steps on how to do this below if need be. Otherwise, move on to the first step to creating your custom audience.
How to create an Outbrain Pixel for your Website or funnel
How to Create a Custom Audience (Segment) for Exclusions
1. Go to your Outbrain Ads dashboard, then click on “Audiences” on the left.
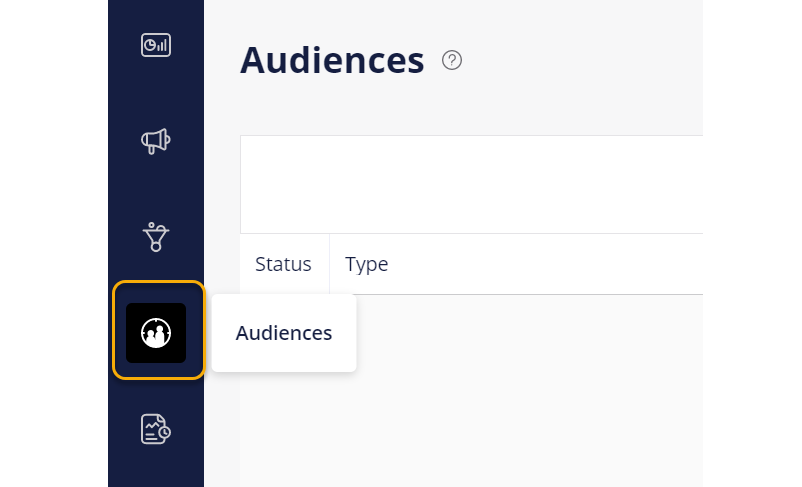
2. You will likely see the “Create Segment” form pop up if you haven’t created a custom audience yet. If so, skip to the next step and start filling it out.
However, if you do not see that form pop up, click on the button “Add Audience” to create the custom audience.

3. Give your segment a name, and set the time frame to whatever you’d like between 1 and 180 days.

4. Then make sure the collection type is set to “Audience Retargeting”, and add the URL of your exclusion page in the box.
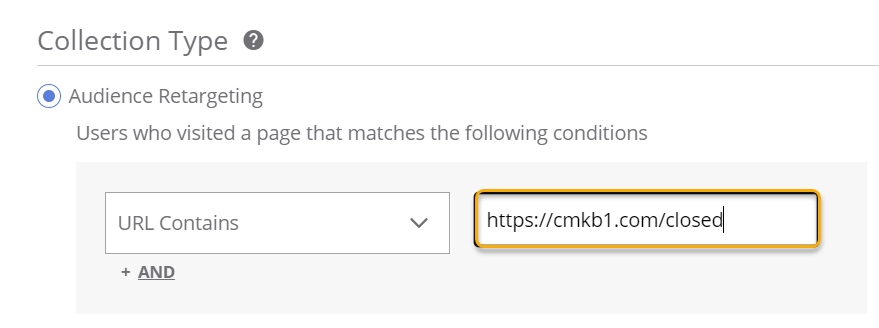
Save the segment, and then lets move on to add the exclusion to your campaign.
5. While editing your campaign, find the section that says “Audience Targeting” and click on “Custom Audiences”.

6. In the section right below this, there are two boxes. One for include, and one for exclude. Add your newly created segment to the “Exclude Audience Segments” box.

Finish editing the rest of the campaign to your preferred settings and information, and then save the campaign.
Now you’re finished with the Outbrain Ads portion and can move on to the setup in ClickMagick.
7. Go back to your ClickMagick Campaigns page, expand the Tools menu, and then click on “Click Shield”.

8. Click on the “Add Rule” button, and then fill in the details. Make sure to use the same URL in the box here as you did in your custom audience you added in Outbrain Ads.
For the other settings on how many clicks to allow in a specific time period, this is purely your preference. For this case, we chose 10 click every 10 minutes.

9. Click on “Add New Rule” and now you have a new rule set up with Click Shield to protect your campaign in Outbrain Ads!
And that’s all there is to it. From this point on Click Shield is a “set and forget” type of thing, and it’ll just continue working for you in the background 24/7, 365 days a year to save you money.
We hope you enjoy this feature, and that it saves you a ton of money. If you have any suggestions on how we can make it even most useful please let us know!
To learn more about using Custom Audiences in Outbrain, visit their article below:
Outbrain – About custom audiences
Click Shield is a feature that’s guaranteed to reduce your Pay-Per-Click ad costs, with no change in conversions. These savings go straight to your bottom line, and if you’re doing any meaningful amount of PPC advertising this alone should more than pay for the cost of ClickMagick!
This article is a step-by-step guide for setting up Click Shield for MGID Ads.
In order for this to work, you’ll need to have your MGID Pixel set up and installed on every page in your website. You can review the steps on how to do this below if need be. Otherwise, move on to the first step to creating your custom audience.
How to create a MGID Pixel for your Website or funnel
How to Create a Custom Audience for Exclusions
1. Go to your MGID Ads dashboard, then click on “Audiences”

2. Click on the button “New Audience” to create the custom audience.

3. Give your audience a name, and then make sure the target type is set to “Page Link”.
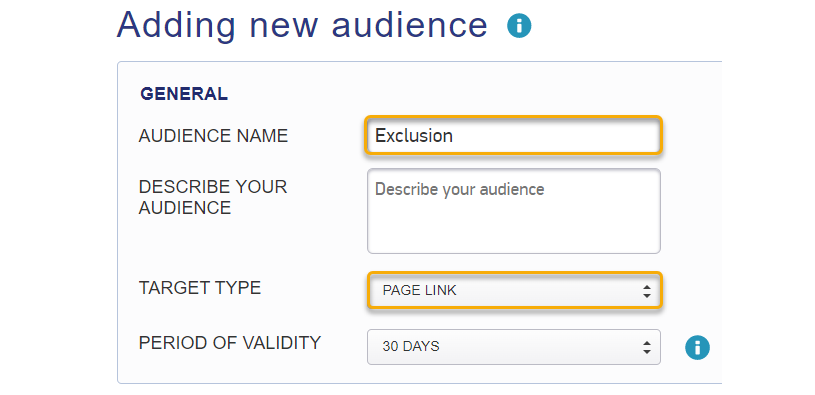
4. Set the dropdown menu to “Contains”, add the link to your exclusion page into the box, and click “Save Audience”.
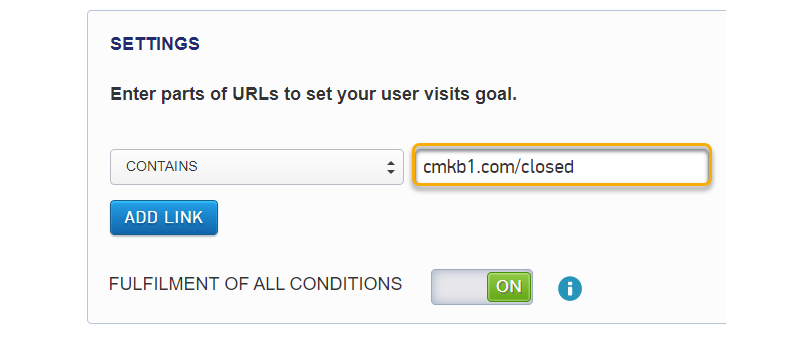
Note: You can either add in the URL like you see above, or just use the page slug like “/closed”. However, you are not able to add the protocol in the beginning (e.g. https://) per MGID guidelines.
Now it is time to add the exclusion to your campaign.
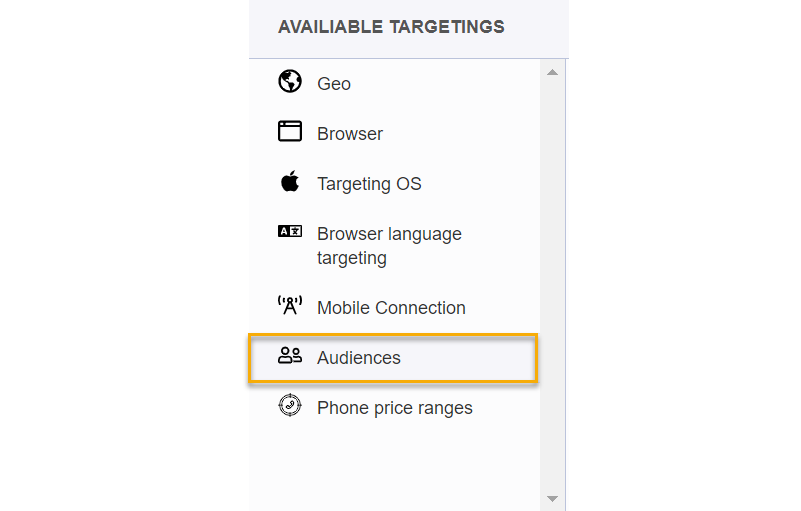
5. While editing your campaign, find the section that says “Available Targetings” and click on “Audiences”.
6. Set the audience you just created as an exclusion by clicking the red minus (-) icon next to the audience name. If done correctly, you should see it listed in the “Selected Tagetings” box.
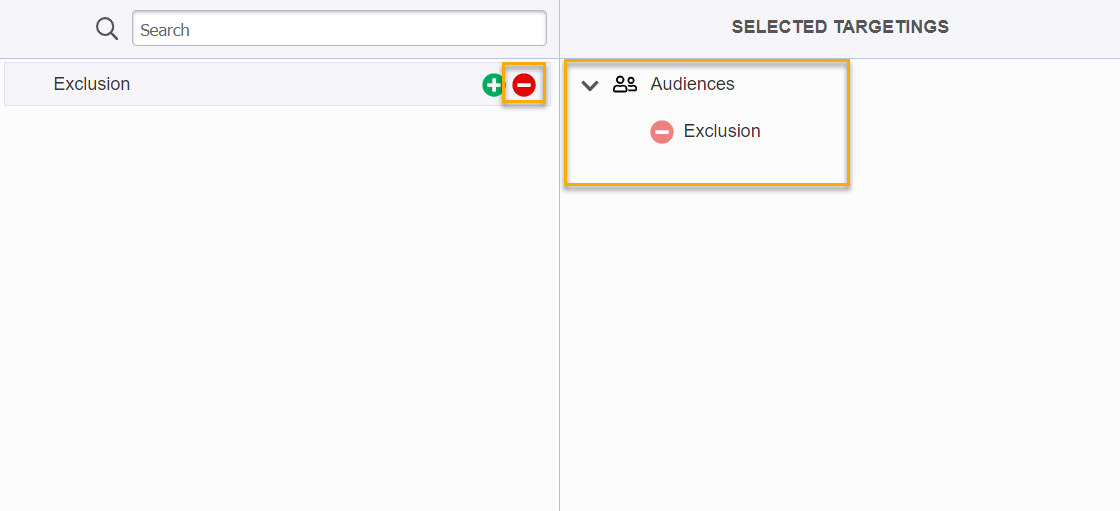
Now you’re finished with the MGID Ads portion and can move on to the setup in ClickMagick.
7. Go back to your ClickMagick Campaigns page, expand the Tools menu, and then click on “Click Shield”.

8. Click on the “Add Rule” button, and then fill in the details. Make sure to use the same URL in the box here as you did in your custom audience you added in MGID Ads.
For the other settings on how many clicks to allow in a specific time period, this is purely your preference. For this case, we chose 10 click every 10 minutes.

9. Click on “Add New Rule” and now you have a new rule set up with Click Shield to protect your campaign in MGID Ads!
And that’s all there is to it. From this point on Click Shield is a “set and forget” type of thing, and it’ll just continue working for you in the background 24/7, 365 days a year to save you money.
We hope you enjoy this feature, and that it saves you a ton of money. If you have any suggestions on how we can make it even most useful please let us know!
To learn more about using Custom Audiences in MGID, visit their article below:
MGID – About custom audiences
Article 524 Last updated: 08/05/2024 4:12:35 PM
https://www.clickmagick.com/kb/?article=524
