|
How do I track phone sales and other offline conversions?
If you take phone orders, accept wire transfers, COD, or accept payment in other ways offline, traditionally this has been next to impossible to track accurately. But ClickMagick supports tracking of phone sales and any other sales or conversions you generate offline in most cases.
There are two ways you can track these offline sales, but first let’s talk about what cannot be tracked …
Offline Conversions that cannot be tracked
In order to properly track phone orders and other offline conversions, you’ll need to provide ClickMagick with either the customer’s email address or Campaigns Visitor ID. In most cases this should not be an issue.
The only case where ClickMagick cannot effectively track your offline sales is if people do not interact with your site at all before calling in. For example, if visitors click an ad and land on your homepage, and you have your phone number right there on your homepage, this simply cannot be tracked by ClickMagick or any other “normal” tracking system.
This requires “Call Tracking,” which is a very different form of tracking that ClickMagick doesn’t provide.
This requires presenting different phone numbers to different visitors – as the phone number itself is the only thing that can be used for tracking them. The more traffic you get the larger the “number pool” you’ll need, and this can end up costing thousands of dollars a month. You’ll want to Google “call tracking” if you really need this type of tracking.
Generally speaking, if these normally “untrackable” phone orders make up just a small percentage of your total sales, setting up an effective Call Tracking solution isn’t going to be worth it. And a small percentage of untrackable sales isn’t going to affect your overall stats in any statistically significant way.
Offline Conversions that can be tracked
With that being said, as long as visitors have interacted with your site by opting in or submitting some other type of form with their email address, or you have a set up that captures your visitors’ Campaigns Visitors IDs, you can easily add any sales generated offline to ClickMagick in two different ways.
You do need to be using one of the two methods of Campaigns Cross-Device Tracking as described in the article below, so you’ll want to make sure you have this working first.
In most cases this is simply a matter of enabling the capturing of Visitor Info in ClickMagick ...
How do I set up cross-device tracking for Campaigns?
Method #1 – Send sales to ClickMagick using a Postback or Webhook (except Shopify)
If you have the ability to send a Postback or Webhook when you enter these offline sales into your CRM for example, you can have these sent to ClickMagick automatically. Depending on the other apps you use, you may need to use something like Zapier to help facilitate this.
Check out the short article below to learn more:
How do I generate Campaign conversions with Postbacks or Webhooks?
Method #2 – Enter sales into ClickMagick using the Offline Conversions Tool (except Shopify)
The other option is to simply use the Offline Conversions Tool to enter any sales that are generated offline. Just enter the conversion details, including the customer’s email address or Visitor ID, and the conversion will be tracked as usual.
If you’re using Automated Cross-Device Tracking (most common) you’ll simply enter the visitor’s email address along with the rest of the conversion details, and if you’re using Advanced Cross-Device Tracking you would enter the Campaigns Visitor ID rather than the email.
If you prefer, you can also bulk upload your offline conversion data in the Offline Conversions Tool at any time. Click below to learn how to format the file you’ll need to upload:
Batch uploading conversions via a CSV file
What about just filling out my online order form using my customer’s information?
This won’t work. At best you would have to do this using an incognito window and an IP address that has never logged in to ClickMagick – otherwise ClickMagick will attribute the sale to “you” – and even then this could only be tracked as an organic sale, which doesn’t provide any value. You should use the Offline Conversions Tool instead.
What if I’m using ClickMagick’s Shopify App?
If you have a Shopify store and you need to enter offline or phone sales, you’ll generally be adding those to your store via the Shopify Admin, as opposed to entering the sales into a CRM for example.
And when you add a sale to your store via the Shopify Admin, the sale will normally be sent to ClickMagick automatically.
However, as explained above, in order for a phone or other offline sale to be tracked properly in ClickMagick, the customer’s original click needs to have been tracked by ClickMagick, and the customer must have previously provided their email address by opting-in or submitting some other type of form.
If customers call you to place an order without you first having collected their email – for example if you have your phone number right on your homepage – these phone orders simply can’t be tracked, and having Shopify send these to ClickMagick will cause issues because they cannot be tracked properly.
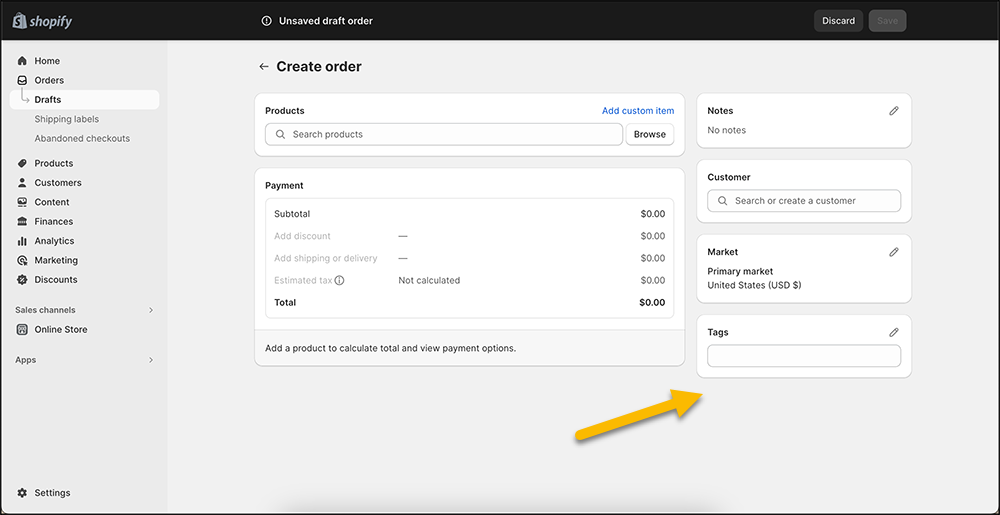
In this case you will want to create a custom tag with a value of
cmc_ignore in Shopify, and be sure to apply this tag to any phone orders you enter, which will tell ClickMagick to not attempt to track the sale.
Article 522 Last updated: 07/12/2024 11:15:27 AM
https://www.clickmagick.com/kb/?article=522
